How to insert a Table in Squarespace easily
Tables are essential tools for organizing data effectively on your website. They offer a structured way to present information, making it easier for users to read and understand complex data sets. Lacking of native table in Squarespace can be frustrating for users needing this functionality. However, there are various methods and tools available to integrate tables seamlessly into your Squarespace site.
Why Tables are Essential for Organizing Data on Your Website
Utilizing table in Squarespace for data organization offers several key benefits:
Efficient Data Organization: Tables allow you to present complex data in a structured and easily navigable format. This method is particularly beneficial for displaying comparisons, numerical data, and categorical information.
Improved Readability: A well-designed table enhances readability by clearly segmenting information into rows and columns. This structure helps users quickly locate and understand the data they need without wading through dense paragraphs.
Enhanced Visual Representation: By incorporating design elements such as borders, shading, and color-coding, tables can visually highlight important data points. This visual representation not only makes the information more engaging but also aids in quick comprehension of complex datasets.
These advantages underscore the importance of tables in creating a user-friendly and informative website.
Options to Add Table in Squarespace
Option 1: Using Images as Tables
Creating tables as images involves designing your table in an external software or graphic editor. Applications like Canva allow you to customize the appearance of your table to match your website's design aesthetic.
Steps to create and add table in Squarespace as images:
Design Your Table: Use Canva to create the table. Customize the layout, colors, fonts, and borders to align with your website's theme.
Export the Table as an Image: Once you are satisfied with the table's design, export it as a high-quality image (e.g., PNG or JPEG)
Embed the Image into Squarespace: Navigate to the page where you want to display the table. Use an “Image Block” and upload the exported image. Adjust the image size and alignment according to your page layout.
Table in Squarespace with Canva templates
Limitations of using images as tables:
Non-responsiveness: Unlike HTML tables, image-based tables do not adapt well to different screen sizes, leading to poor user experience on mobile devices.
Accessibility Issues: Users relying on screen readers will not be able to interpret the content within image-based tables.
Using images as tables may be a quick solution for visually integrating data on your Squarespace site. However, it's essential to weigh these limitations against your website’s goals and user needs before opting for this method. Other alternatives may offer better responsiveness and SEO advantages.
Option 2: Use Markdown block
Markdown offers a straightforward approach for integrating table in Squarespace site. Squarespace supports Markdown, which allows you to write table syntax directly in the editor.
Steps to create Tables Using Markdown:
Open a Markdown Block: Insert a Markdown block into your page or post.
Use Table Syntax: Write your table using Markdown table syntax. Here's an example:
Markdown table syntax
This simple syntax creates tabular data within your content editor.
Conversion to HTML:
When you view the published page, Squarespace automatically converts this Markdown syntax into HTML tables. This means you can apply any CSS stylesheet to style your table, ensuring it matches your website's design aesthetic.
Benefits of Using Markdown:
Ease of Use: The simplicity of the syntax makes it accessible even for beginners.
Customization: You can enhance tables with CSS for better visual representation.
SEO-Friendly: Unlike image-based tables, these are responsive and searchable by search engines.
Markdown provides an efficient way to integrate functional, styled tables on your Squarespace site without relying on external tools or plugins, Markdown table is compatible with Personal users.
This is my preferred method for creating quick and simple tabular content, especially in blog writing, as it allows me to edit the table in Squarespace without leaving the editor.
Pro tip: Creating and formatting tables can be time-consuming, but with the Synced Blocks plugin, you can store your tables in the Reusables blog and insert them across pages. When you update the table in its original content, it automatically updates everywhere.
Option 3: Use Code Block
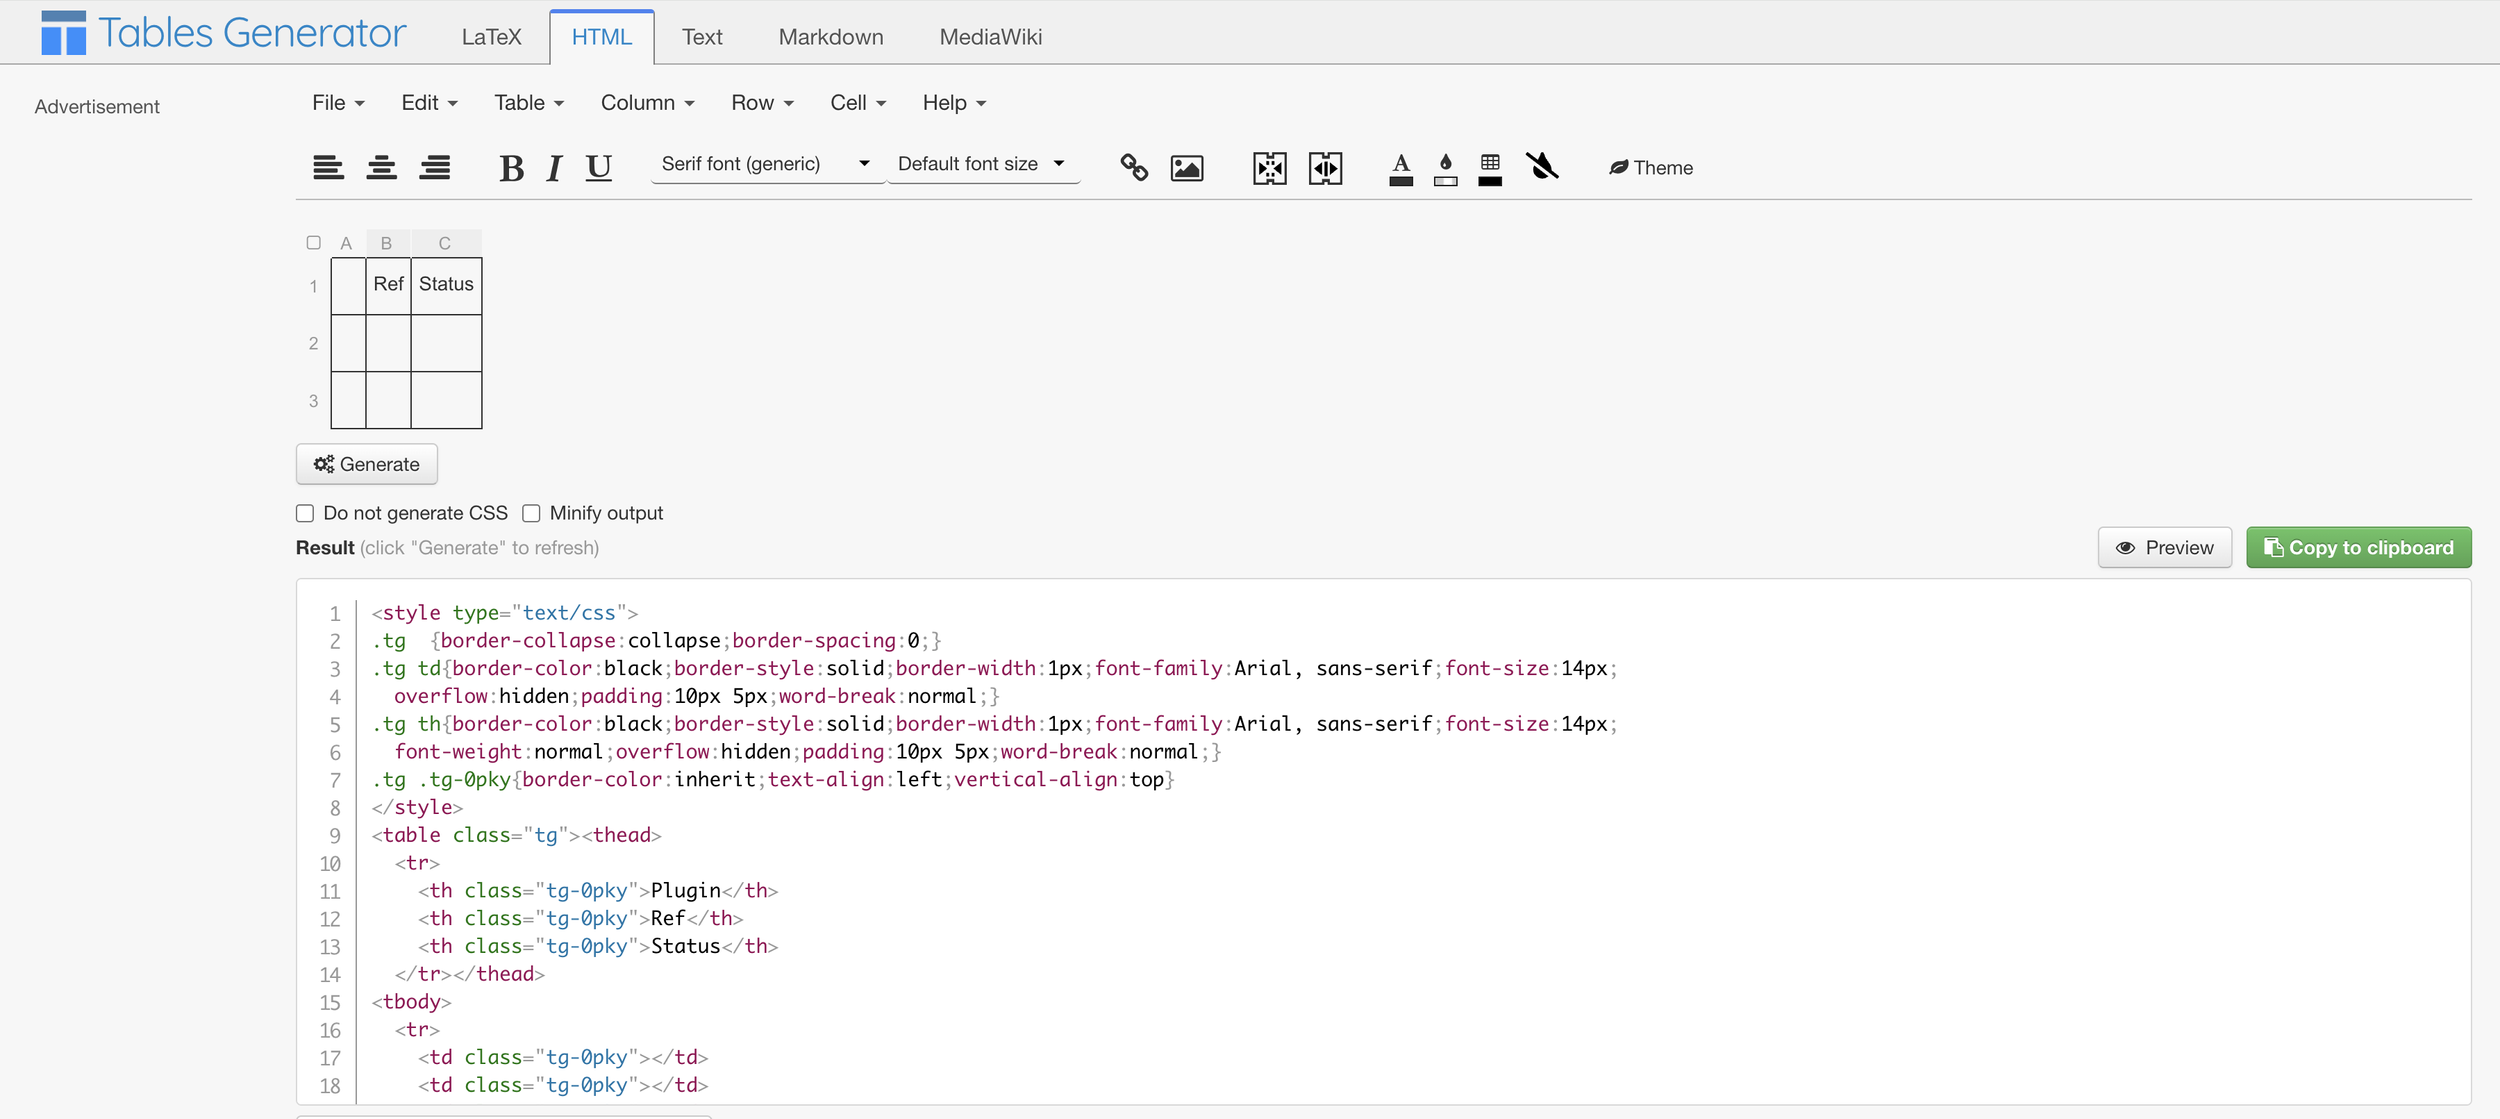
Integrating HTML table code into Squarespace for displaying tables can be an effective solution if you're seeking more customization. Here's how you can do it:
Generate Your Table:
Use any reputable online table generator (e.g., TableGenerator.com or Div Table).
Input your data and customize the table's appearance as needed.
Copy the generated HTML code.
HTML table generator
Embed table in Squarespace:
Go to the page where you want to add the table in your Squarespace editor.
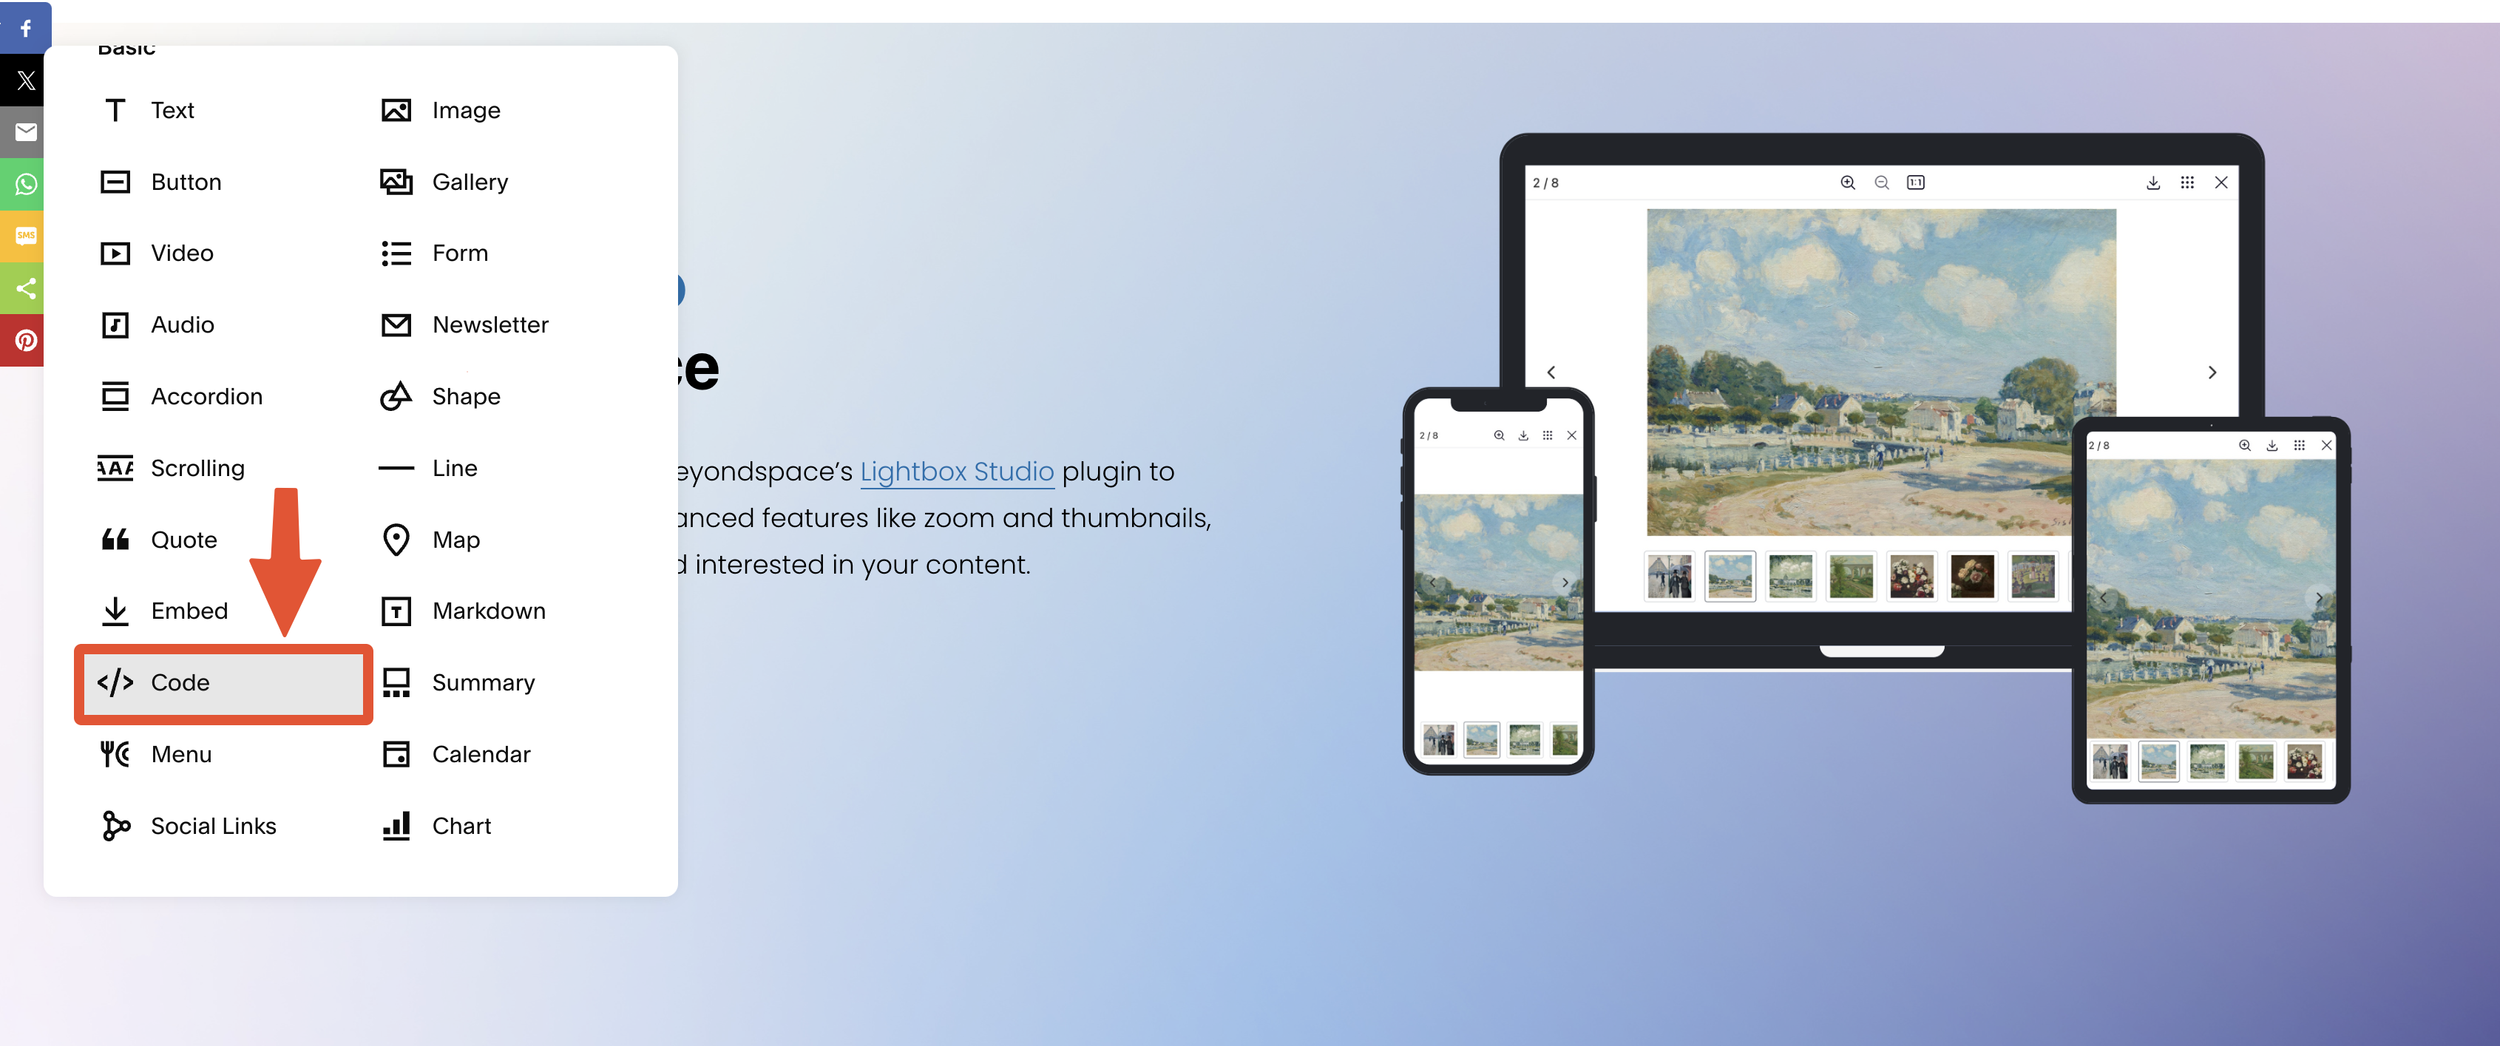
Add a Code Block.
Paste the generated HTML code into the Code Block.
Insert table to Code block
Within the Code Block, add a <style> tag to define custom CSS styles specific to your table, or alternatively, use the Custom CSS Editor in Squarespace's Design panel for global styling control.
Option 4: Using Squarewebsites Table Block
If you need a table in Squarespace option directly in the block selector, buying the Table Block plugin from Squarewebsites can be a good solution. This custom table block plugin is designed specifically for Squarespace websites and works well with your existing design.
Custom table block selector
Key Features of the Table Block Plugin:
Easy Integration: The plugin allows you to add tables effortlessly without needing to write any code.
Styling Options: Custom table block comes with basic styling, but you can update the table look & feel easily with custom css
Responsive Design: The plugin support mobile styling out of the box
Sortable columns: Table block can be configured to add sort feature to the columns
Multiple source support: You can edit the table content directly on the block editor, import it from CSV or sync the table with a public Google Spreadsheet
Custom Table Editor
Advanced Filtering Options:
For those who need advanced features like filtering and pagination, an additional option is to buy the Universal Filter. This tool enhances the functionality of your tables by allowing users to sort and filter data according to their needs, making it easier to navigate large datasets.
Considerations:
Cost: The Table Block plugin comes at a one-time cost of $45, which may be a worthwhile investment for the added convenience and functionality.
Flexibility: While it offers numerous features, it's essential to evaluate if it meets all your specific requirements before purchase.
Using these plugins can greatly improve your ability to organize data effectively on your Squarespace website.
My takeaway: Custom table block uses Markdown block under the hood, so my advice is to avoid placing 2 Table blocks or Markdown blocks nearby, as Squarespace will tend to merge markdown blocks into one. To prevent this, separate Table blocks with Spacer or Line or another type of block.
Option 5: Datawrapper Tables Widget
Datawrapper offers a versatile solution for embedding tables in Squarespace. It provides free plan available at Datawrapper, making it accessible for all users.
Key Features of Datawrapper Table Widget:
Multiple Data Sources: You can connect various data sources, including CSV files and Google Sheets. This flexibility allows you to keep your tables updated automatically as your data changes.
Responsive Design: The tables are designed to be fully responsive, ensuring they look great on any device.
Advanced Filter & Pagination: These advanced features are supported out of the box, allowing users to view different aspects of your data effortlessly.
Datawrapper is not just a plain HTML5 tool; it is a visualization toolkit where you can embed bar charts, line charts, and heatmaps into tables. This makes your content more engaging and your statistics easier to follow.
Creating sparklines in Datawrapper tables. Source: datawrapper.de
My takeaway: Datawrapper table is rendered dynamically using JavaScript; sometimes the table will not render fast enough. My experience is to generate the PNG version of the table and display it as a fallback image in case JavaScript cannot load. Let users know what the table is showing about to maintain usability and ensure they can still access important data even if the dynamic table fails to render promptly.
Option 6: Knack App Embed
Knack.com is a full stack no-code app builder, where we can integrate the whole app into your Squarespace website, or just use its grid component as filterable table.
Embedded grid on Squaresapace
To insert Knack grid into your site, follow these steps:
Sign Up for a Knack Account: If you haven't already, create a Knack account and log in to the dashboard.
Create Your App: Use the Knack builder to create your app. Add the necessary tables and fields you need for your data.
Create new Page in your app and insert new Grid view
Copy the Embed code of the page and place it on a Code block of Squarespace
Step-by-step included
Here's an interactive tutorial
** Best experienced in Full Screen (click the icon in the top right corner before you begin) **
My takeaway
It's important to keep in mind the following points when considering Knack for your Squarespace website:
Knack offers a free trial, but after that, you'll need to subscribe to their service.
Setting up Knack and getting familiar with its features may require some time investment.
However, if you need advanced data management solutions for your Squarespace website, the functionality and flexibility that Knack offers make it a valuable tool.
Conclusion
Adding tables to your Squarespace website can significantly improve how you present and organize data. While Squarespace doesn’t have a built-in Table block, you can use several effective methods to create and integrate tables:
Tables are essential for:
Improving Readability: Tables help break down complex information, making it easier to understand.
Enhancing Visual Representation: Well-designed tables add aesthetic appeal and clarity to your content.
Boosting User Experience: Organized data allows users to find relevant information quickly and effortlessly.
Embrace these tools and techniques to seamlessly integrate functional and visually appealing tables into your Squarespace site. Focus on readability and responsiveness to ensure your tables look great on all devices.
Additionally, using the Synced Blocks plugin allows you to easily store and manage tables within a centralized Reusables blog, ensuring quick updates across multiple pages with just one edit.


