How to set Delivery date picker for different products on Squarespace
If you are running a business, you already know that selling different products with varying availability can be challenging. Imagine owning a flower shop with a wide variety of flowers. Regular products can take about 2 days to complete, but special items, like custom-made arrangements, require a 3-day lead time.
Now, picture owning a cake store. Usually, cakes can be delivered from Tuesday to Saturday, but during special holidays, you want to introduce exclusive arrangements only available on those specific days.
It's important to set specific availability or delivery dates in situations like these to keep things running smoothly and meet customer expectations. Check out the blog post below for an easy-to-follow guide on using Squarespace Datepicker and Custom Product Forms to make it happen.
Squarespace datepicker on Product Form
How to set delivery date picker
Introducing Squarespace datepicker - Squarespace datepicker plugin, designed to empower you with the ability to set custom delivery dates for each product.
This is made possible by defining multiple datepicker rules and map them to the form fields on Custom product forms.
The below steps assume that you have purchased and activate Squarespace datepicker on your site
Step 1: Configure Your Delivery Rules
Establish your overall business schedule by setting non-working weekdays, lead time, cut-off time, timezone… These settings determine the selectable date items on the calendar. For example: if you don’t delivery on Sunday, all the Sundays on the calendar will be unable to selected, client has to choose another available dates.
Check other available settings in this link
For each of the rules, define a unique name for them, ensure distinguest name for each. For example:
Creations delivery
Arrangements Date
Editting the datepicker rules:
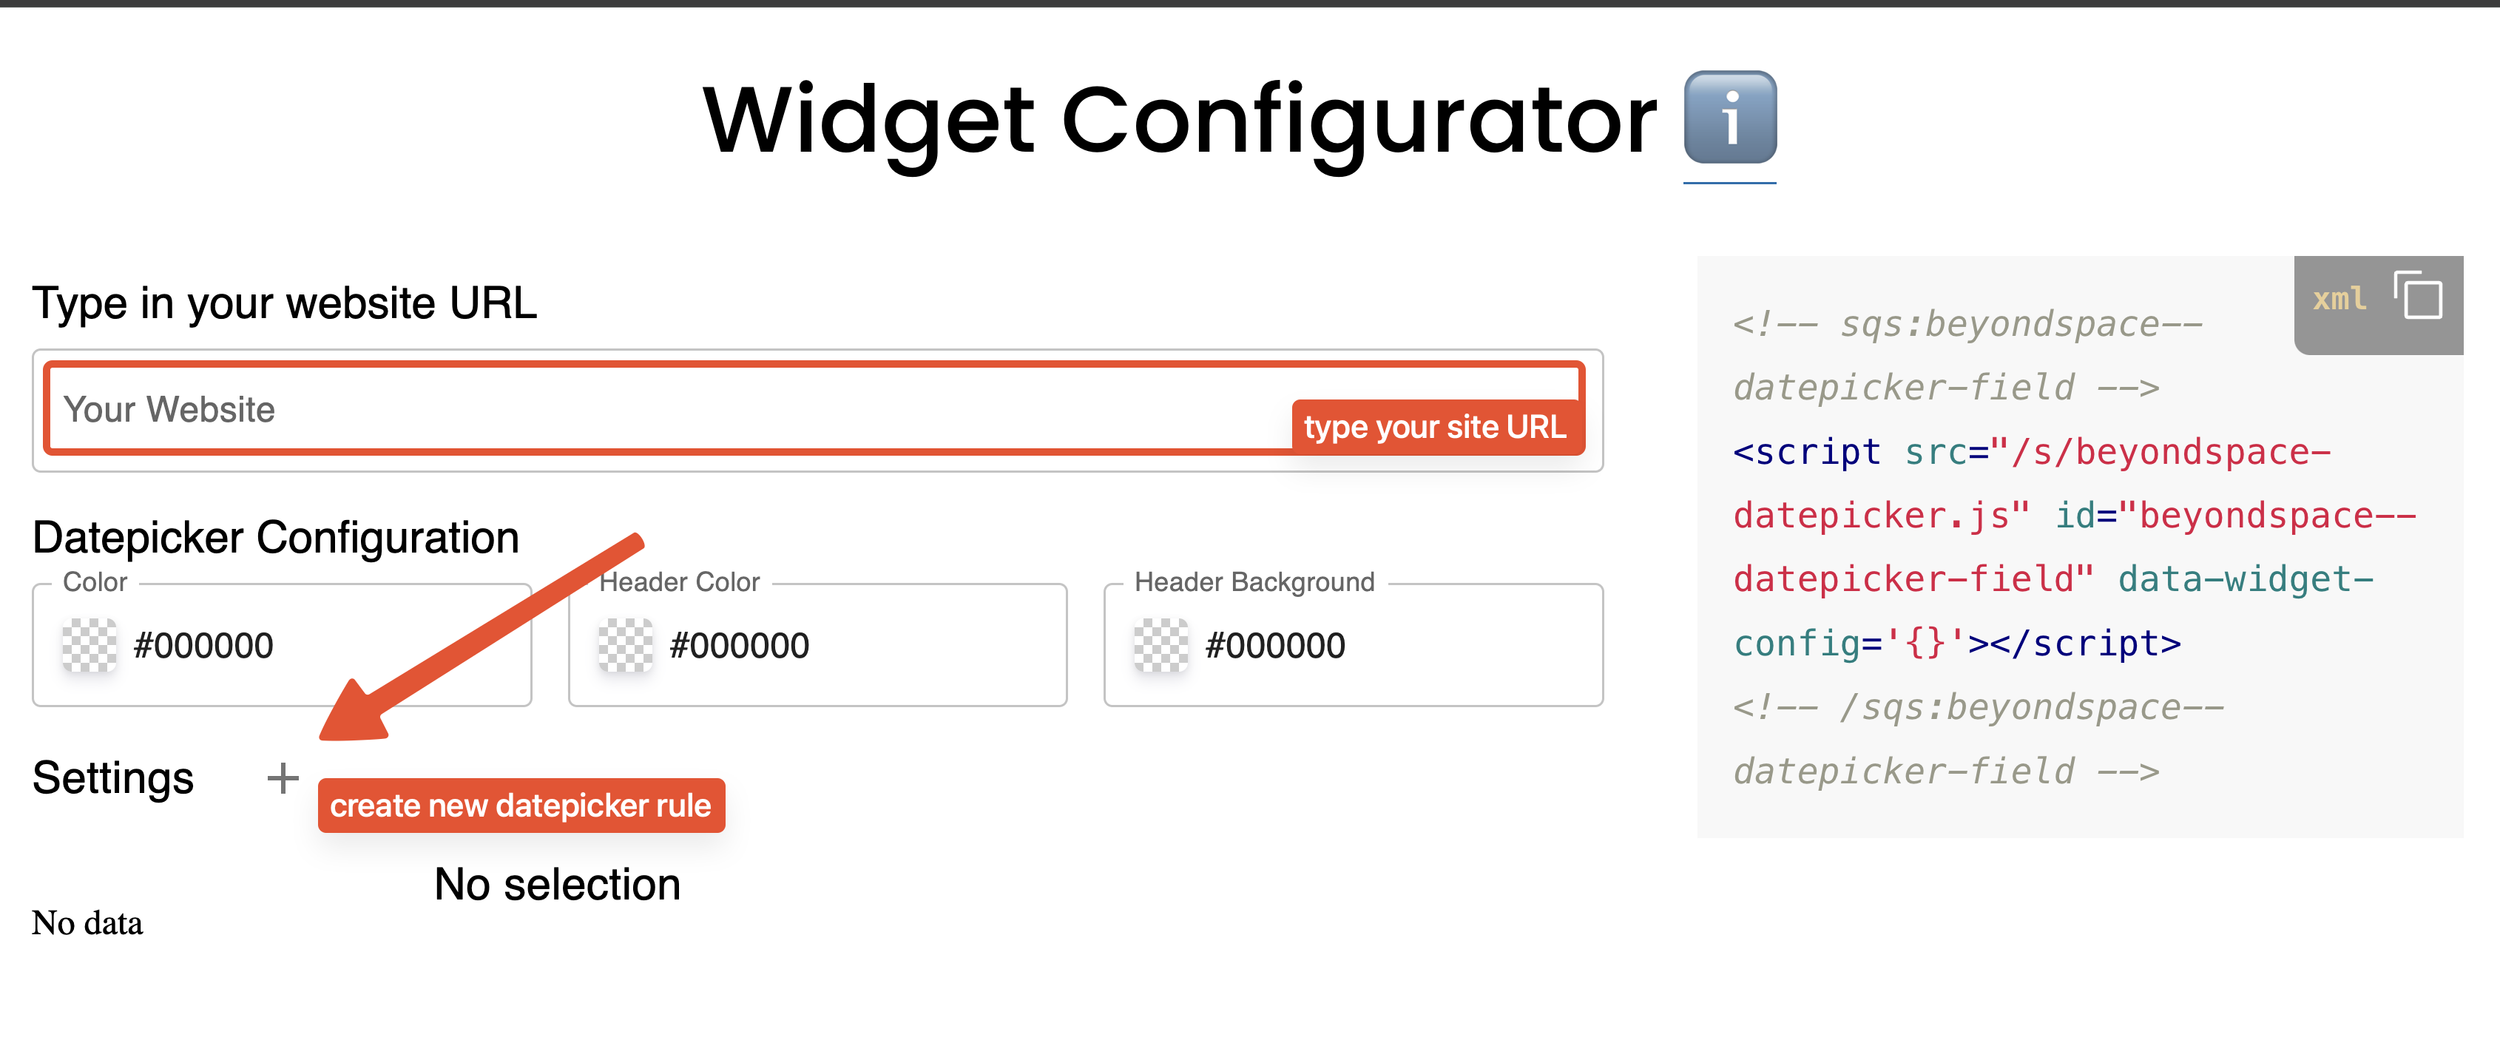
Go to the Squarespace Datepicker playground at the bottom of the page.
Enter your website URL in the URL input field.
Click the Plus icon in the Settings field.
Add the names you created in the previous step.
Select different settings for each rule according to your delivery requirements.
Squarespace datepicker configurator
Update the code
Copy the generated snippet on right panel
Go to your Site Footer injection and replace the current Beyondspace datepicker field snippet with the new one
Press Save
Step 2: Create Custom Product Forms
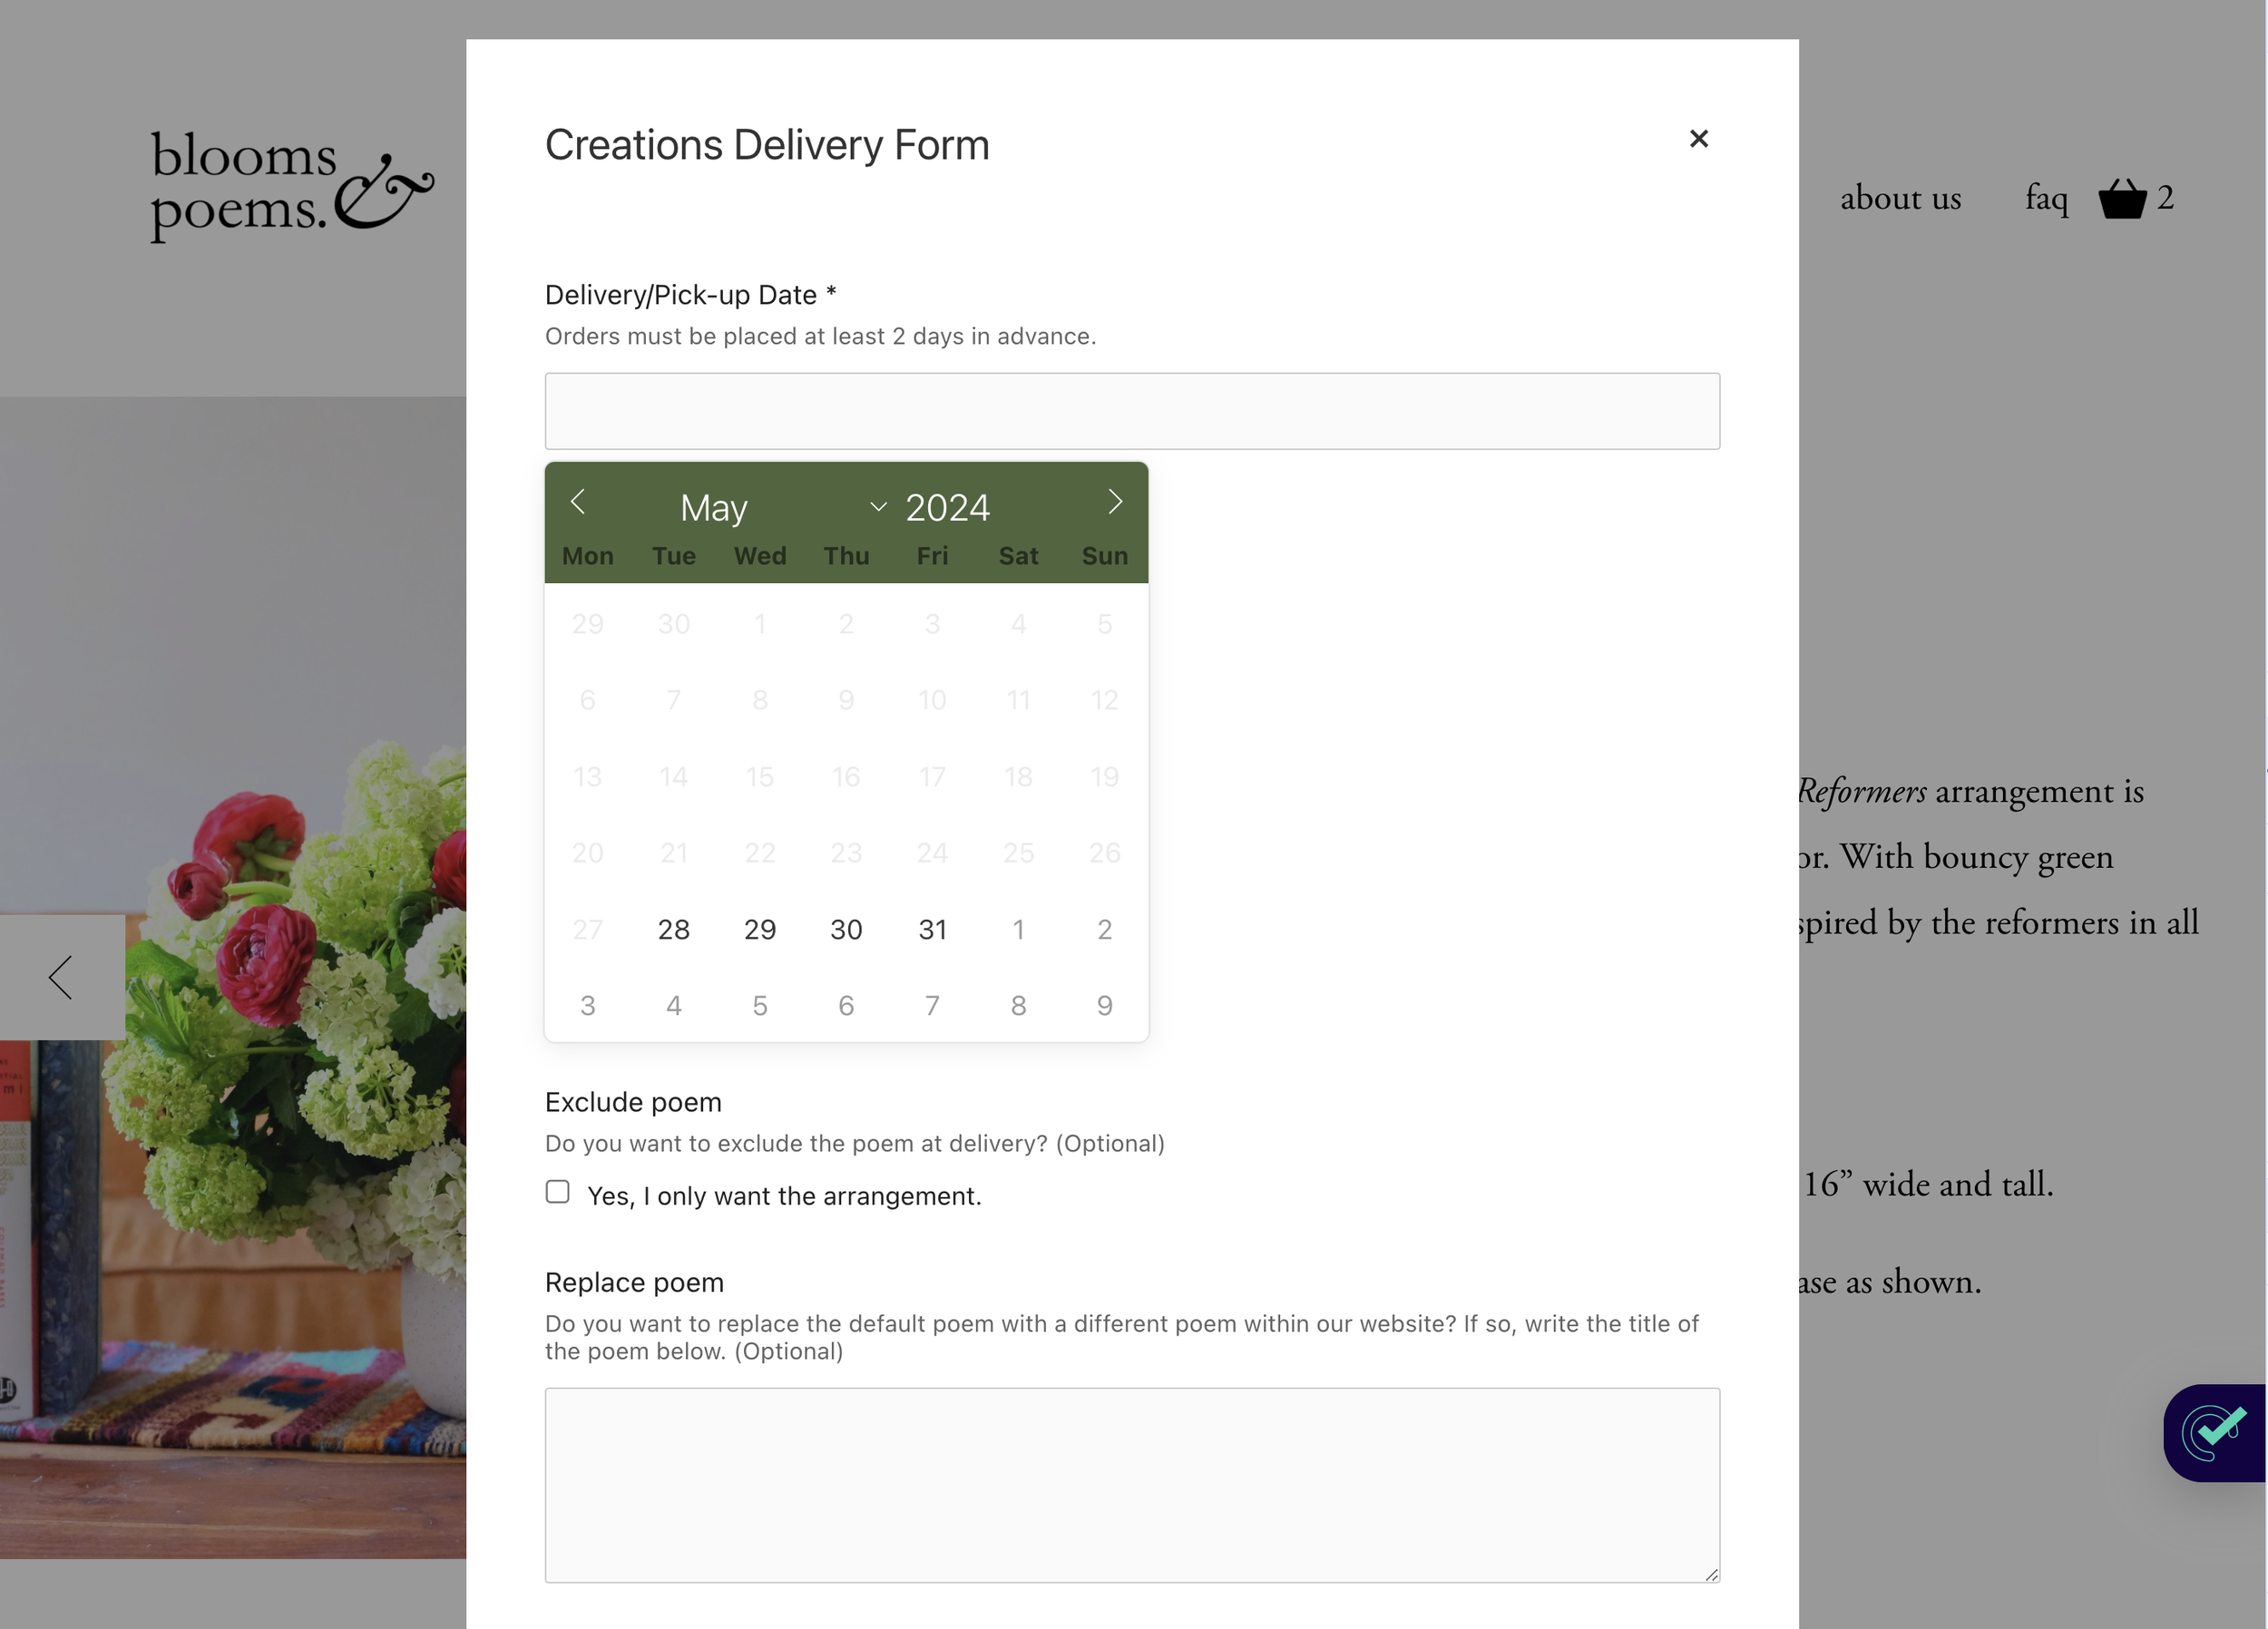
When a customer clicks Add to Cart, a custom form pops up on top of the page. If there are any mandatory fields, the customer must fill them out before they can add the product to their cart.
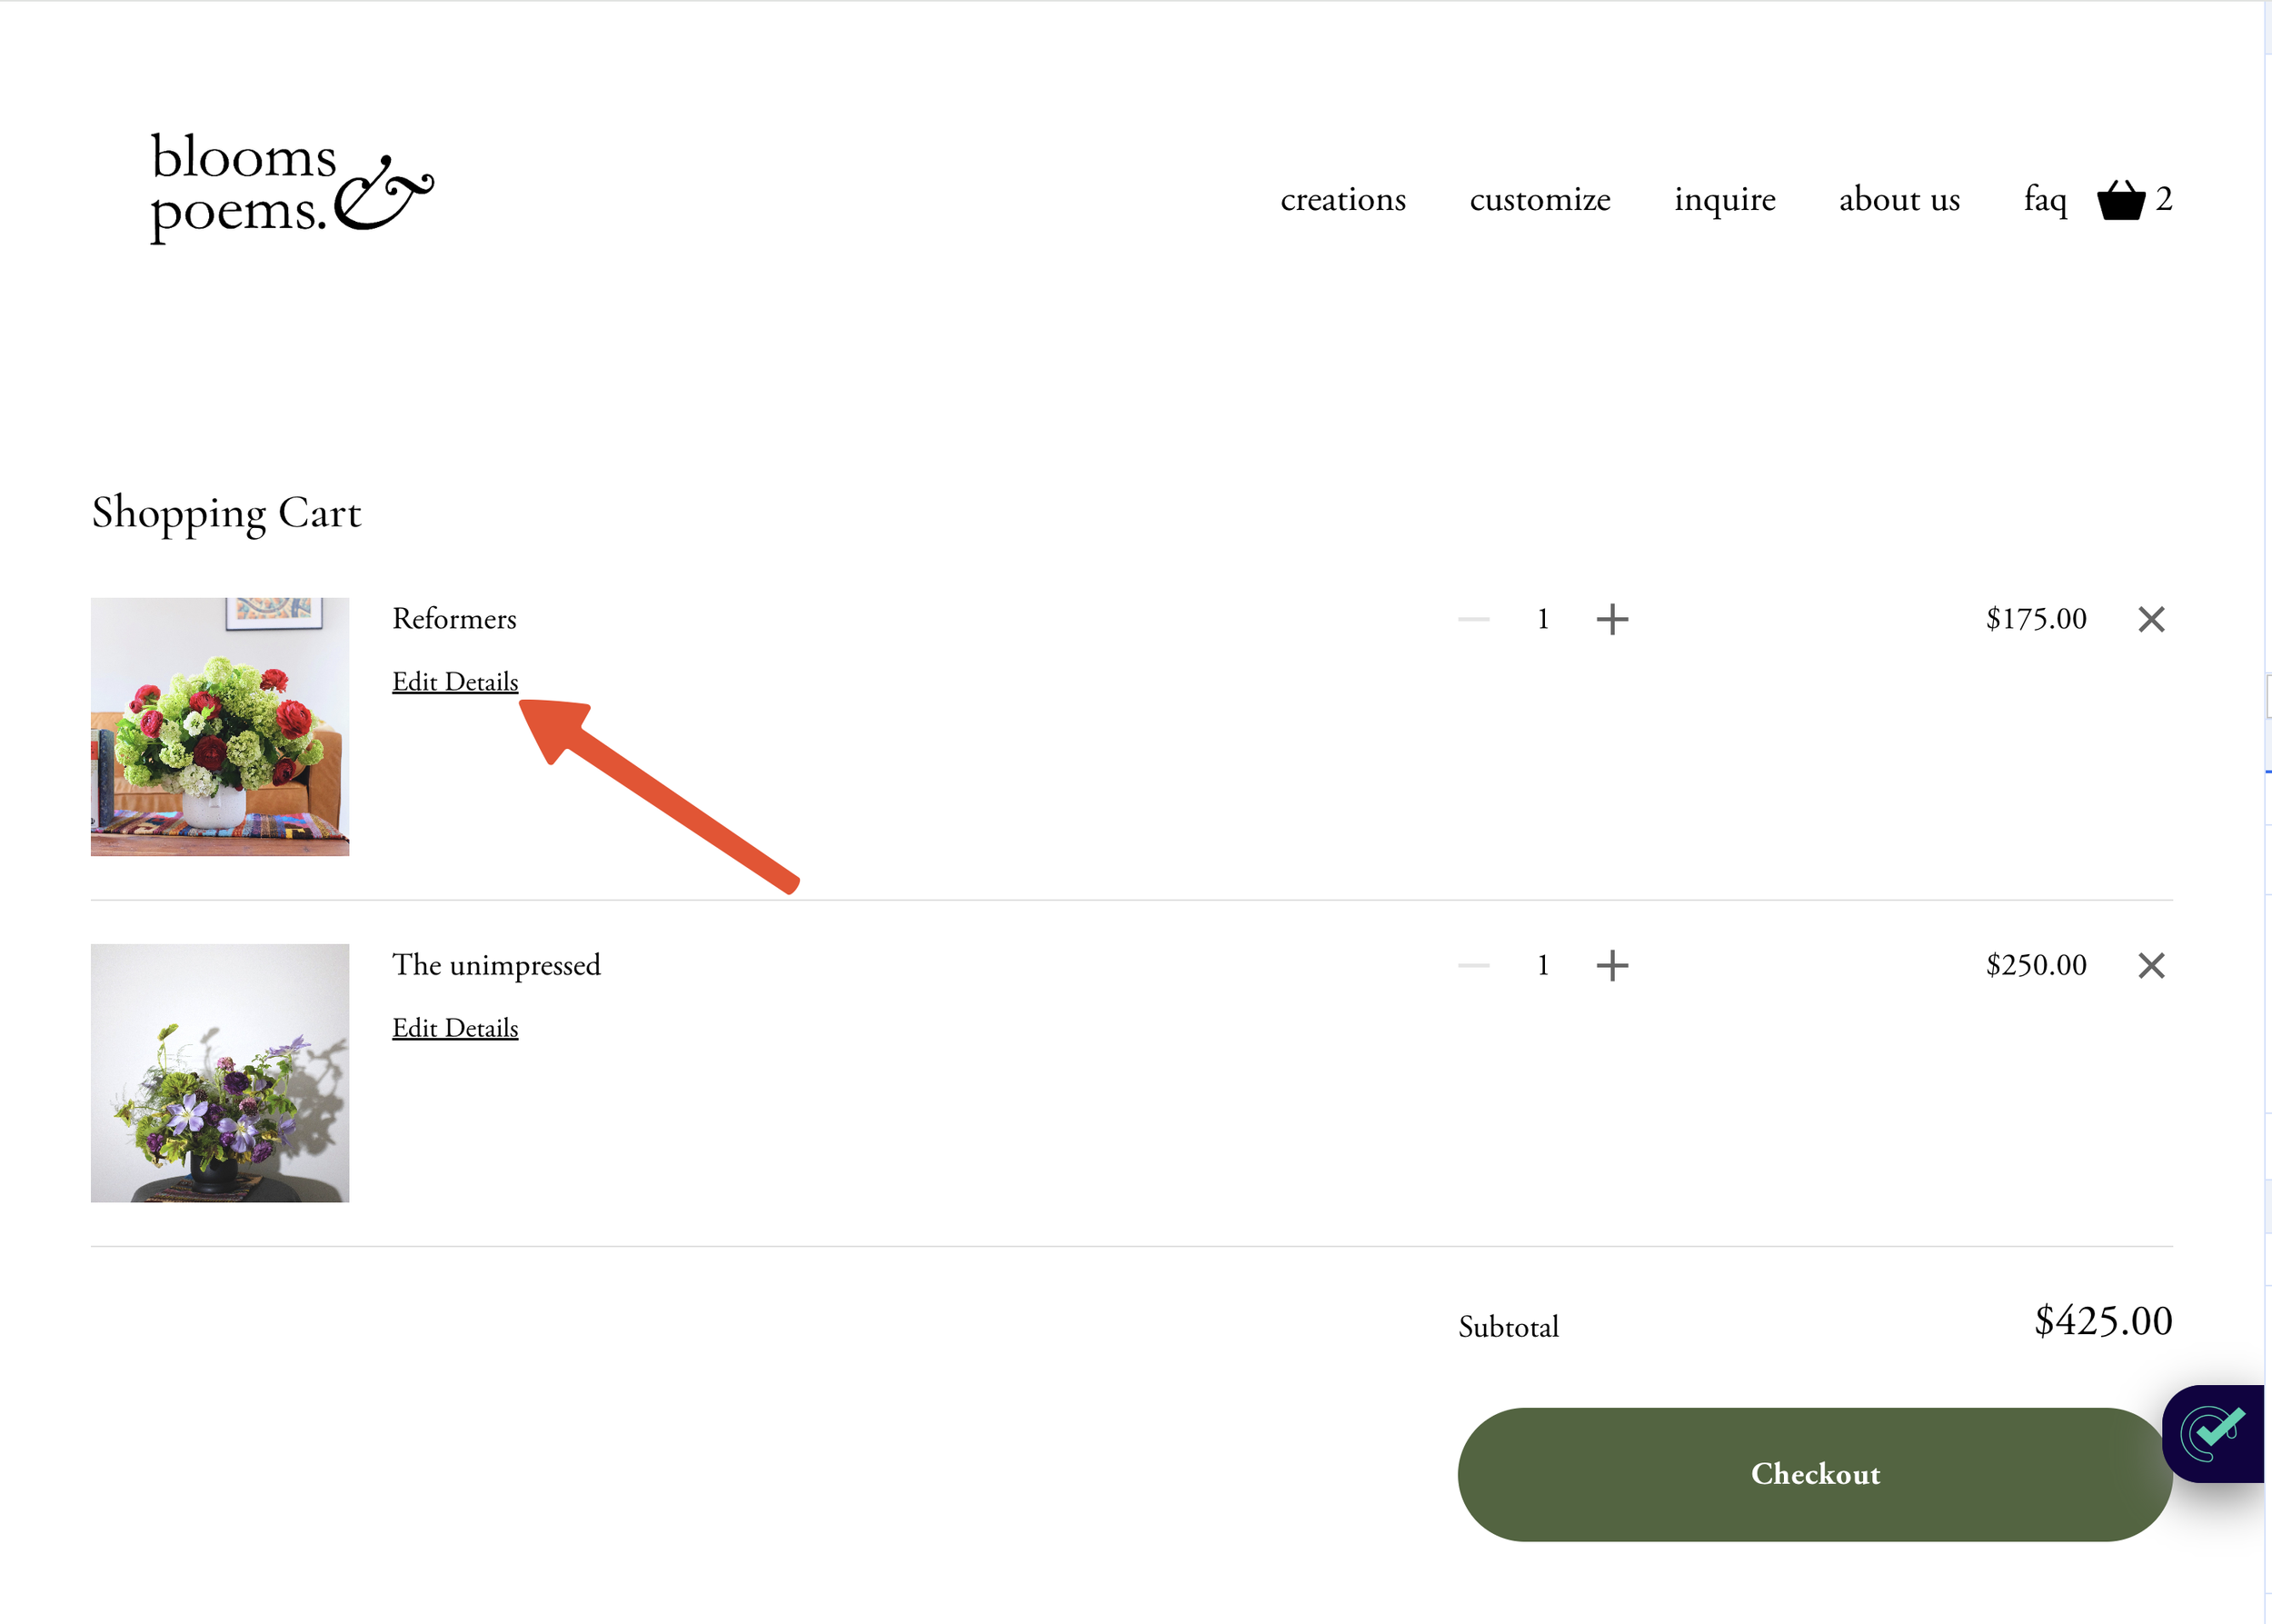
Additionally, customers have the option to review and make changes to the form by clicking on Edit Details below the item in their shopping cart.
Edit product form on Shopping cart
Create a New Custom Product Form
Edit a product in Squarespace.
Under the Checkout section, click "Custom Forms".
Click "Create New Form".
Enter a name in the "Form Name" field.
Click "Add Form Field" to add a field.
Once done, Click "Save", then "Apply", and finally "Save" to publish your changes.
Add custom product form
Use an existing form
When you add a custom product form, you can re-use existing forms you've created for other products.
In the product editor, click Custom forms.
Select an existing form.
Click Apply, then click Save.
Step 3: Map the Datepicker Rule to Form Text Field
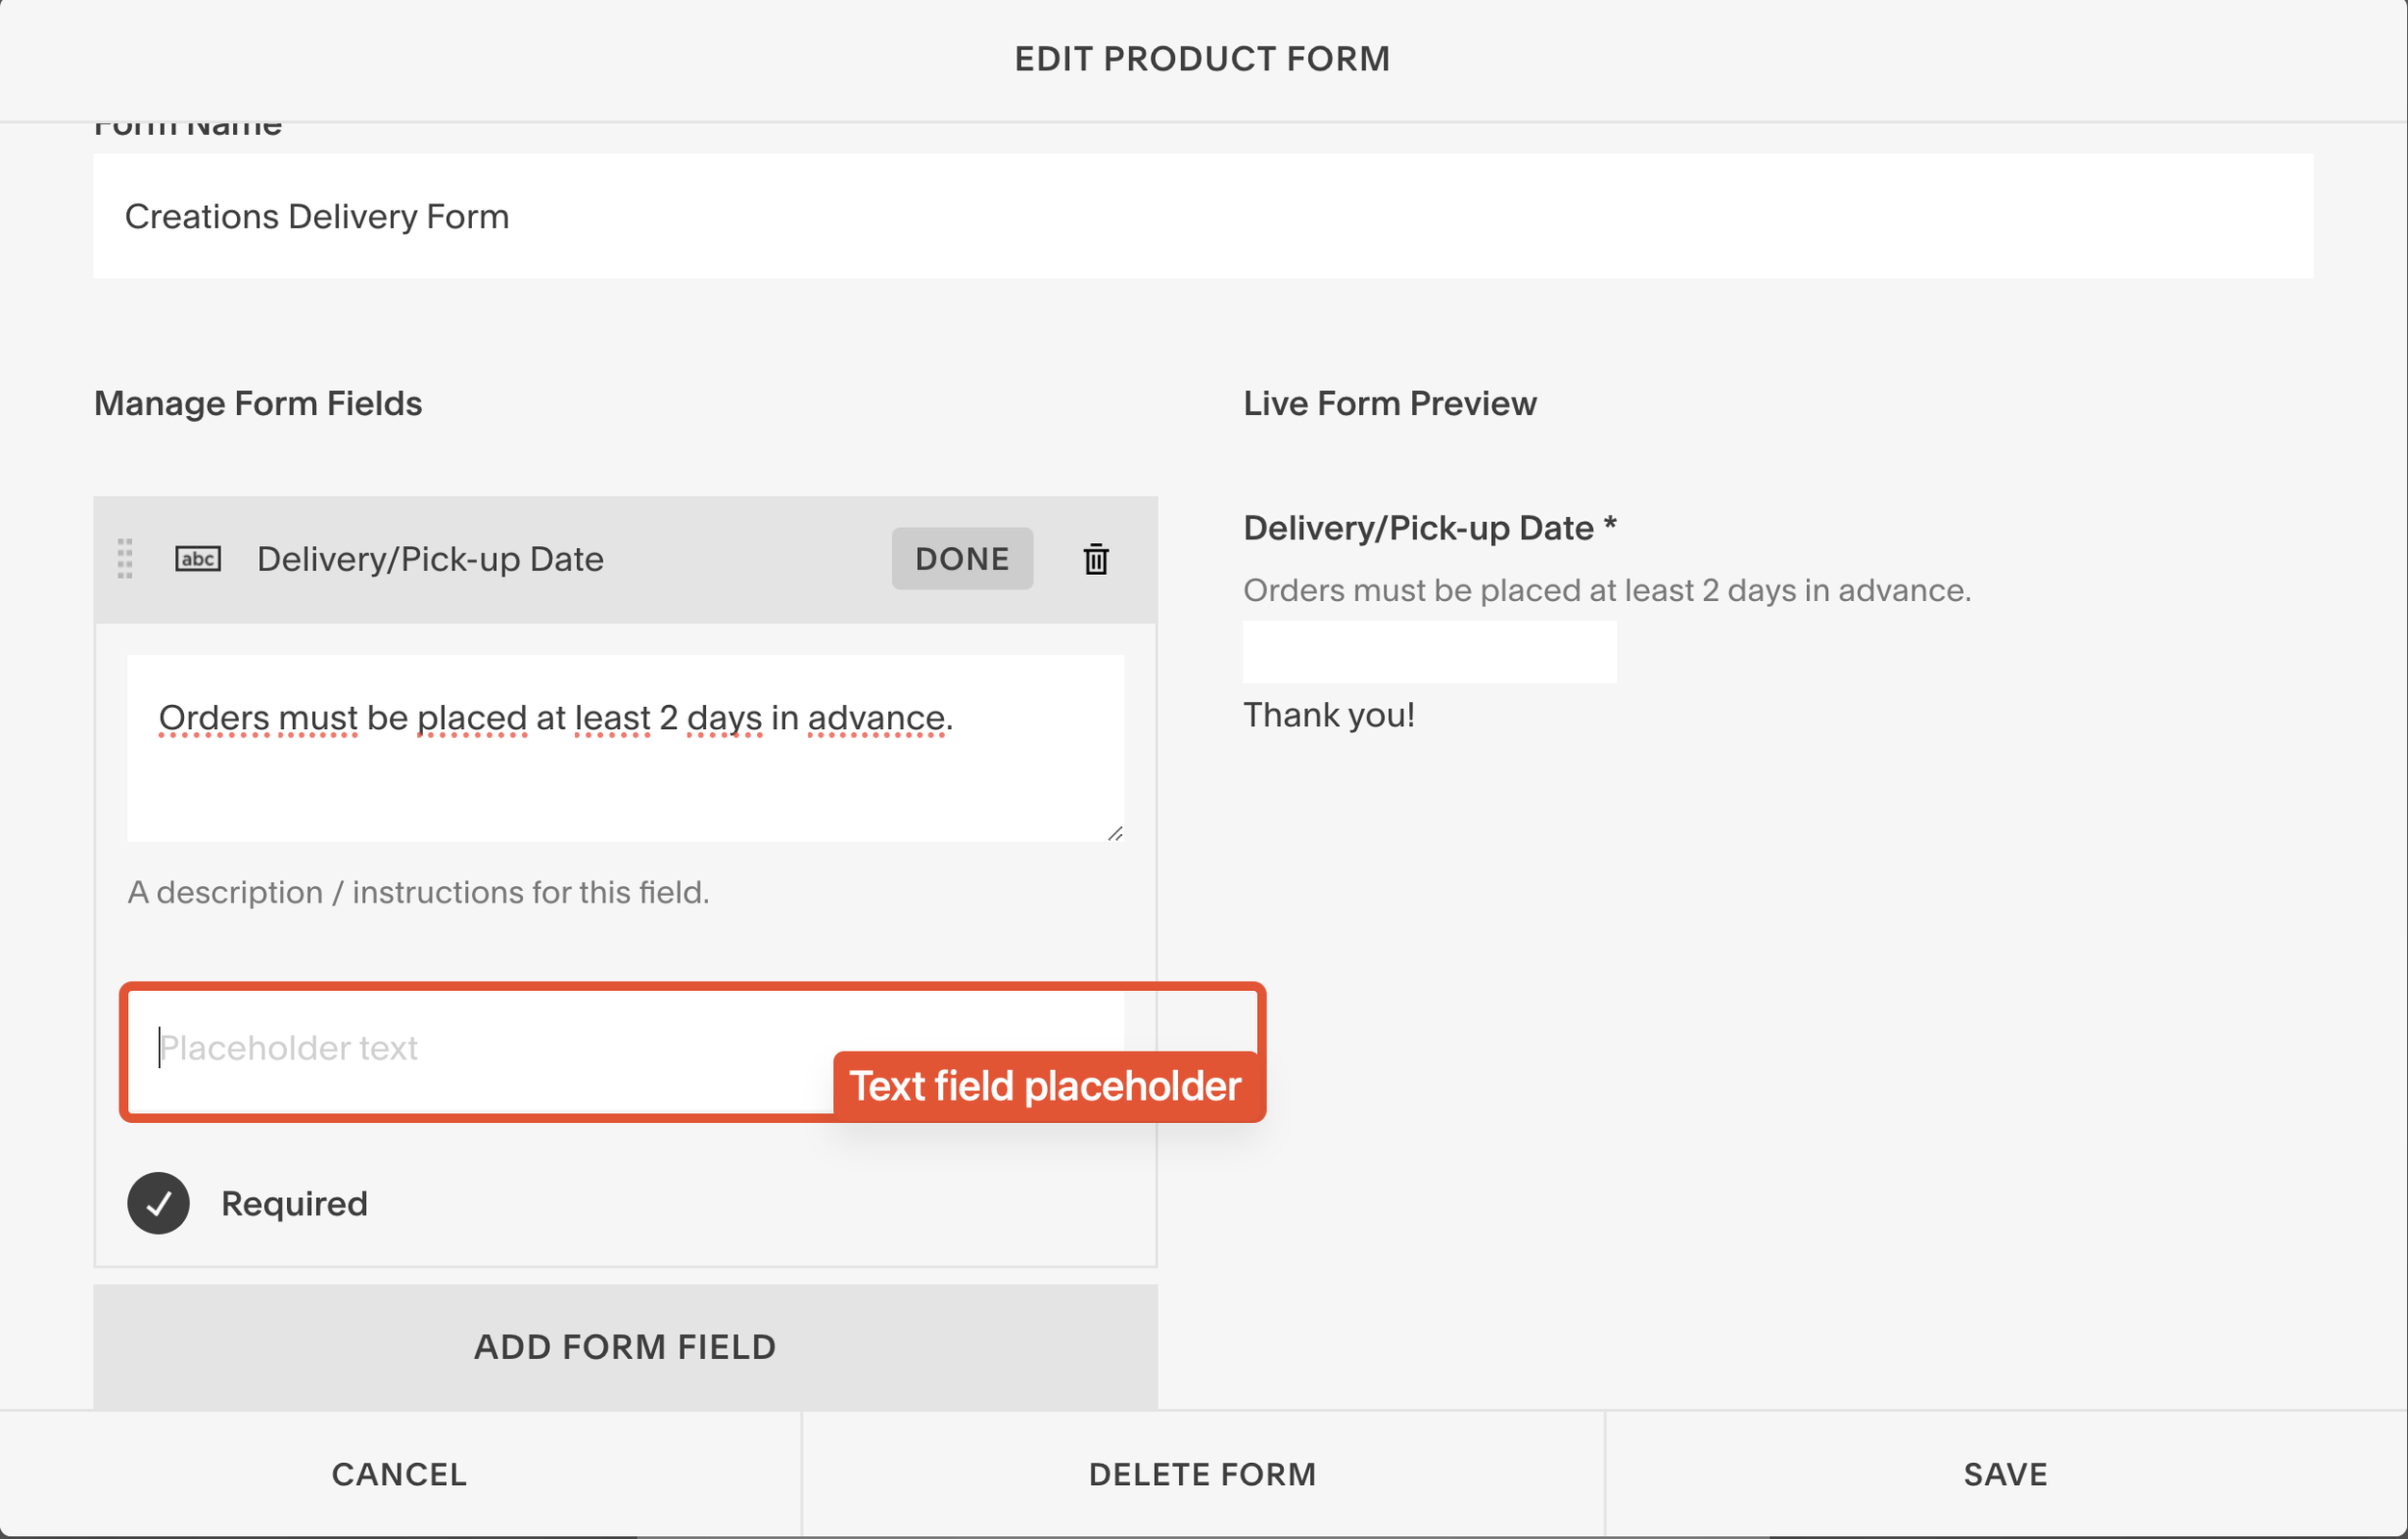
The Squarespace Datepicker plugin transforms Text form fields into calendar datepickers by mapping the datepicker rule name to the placeholder value of the Text field.
To do this, first, select the rule names you created, such as "Creations Delivery" and "Arrangements Date."
Next, set the placeholder value of each Text form field to match the corresponding datepicker rule name. For example, if you have a rule named "Creations Delivery," enter "Creations Delivery" as the placeholder value in the Text field. Once the placeholders are set, the Text fields will automatically convert into datepickers.
Insert Form Text field placeholder
You can create multiple datepicker rules tailored to different delivery requirements and assign these rules to Text fields across various product forms.
Each datepicker can function as a delivery date selector for different products, allowing you to efficiently manage delivery dates and ensure a seamless, accurate customer experience.
Example result
Check the example below to see how product-based delivery dates be shown in action.
Buyers who choose Creations can select delivery dates from the calendar when pressing Add to cart, the lead time for these products are 2 days
Buyers who want Custom arrangement will see different calendar that require 3 days in advanced, you can tell the different by seeing the available day is 29th instead of 28th
Once products are added to cart, we can visit the Shopping cart page and edit the delivery before checking out. For example
Edit datepicker on Shopping cart
Known Limitations
Custom Product Forms vs. Custom Checkout Forms:
Custom product forms are great for gathering information related to individual items. However, if you need to collect information for the entire order, such as a gift message or special delivery instructions, you'll need to create a custom checkout form.
Unfortunately, the datepicker plugin cannot be added to the Checkout page. This means it cannot be used on Custom Checkout Forms because Squarespace does not allow any code to be added to the Checkout page due to security concerns.
Multiple Products, Multiple Dates Issue:
When the datepicker is added to each product form, customers can select different delivery dates for each product if they are checking out multiple items. Currently, there is no built-in workaround for disabling multiple dates within the same order. This means that each product in an order can have a different delivery date, which might not align with your operational preferences.


