How to upload and manage Files on Squarespace
Squarespace allows you to upload various types of files for different purposes, from embedding images and videos to adding downloadable PDFs. However, the way you upload and manage these files depends on the type of content and your specific use case. In this guide, we’ll cover each method for uploading and managing files on Squarespace to help you get the most out of your website.
Using the Link Editor
The Link Editor in Squarespace is a flexible tool that lets you upload files in several different ways: through links in navigation, text, images, buttons, and even auto-layout buttons.
| Entry point | Link Editor | Classic Link Editor | Legacy Link Editor |
|---|---|---|---|
| Availability | Latest version | Appears in certain sections | For gallery blocks |
| Navigation Links | Yes | - | - |
| Text Block Links | Yes | - | - |
| Image Block Links | Yes | - | - |
| Button Block Links | Yes | - | - |
| Auto Layouts | Yes | - | - |
| Gallery Section Links | - | Yes | - |
| Markdown Block Links | - | Yes | - |
| Gallery Block Links | - | - | Yes |
Accessing the Link Editor
With recent updates, Squarespace now includes a refreshed Link Editor that blends seamlessly with the platform’s UI. Here are various ways to access the new Link Editor for file uploads:
Here’s the tutorial to upload files to Squarespace, it used the Navigation’s Link Editor as gateway to the File manager
Here's an interactive tutorial
** Best experienced in Full Screen (click the icon in the top right corner before you begin) **Adding a File via Navigation
1. Go to Pages > Not Linked navigation and click Add Link.
Add link to navigation
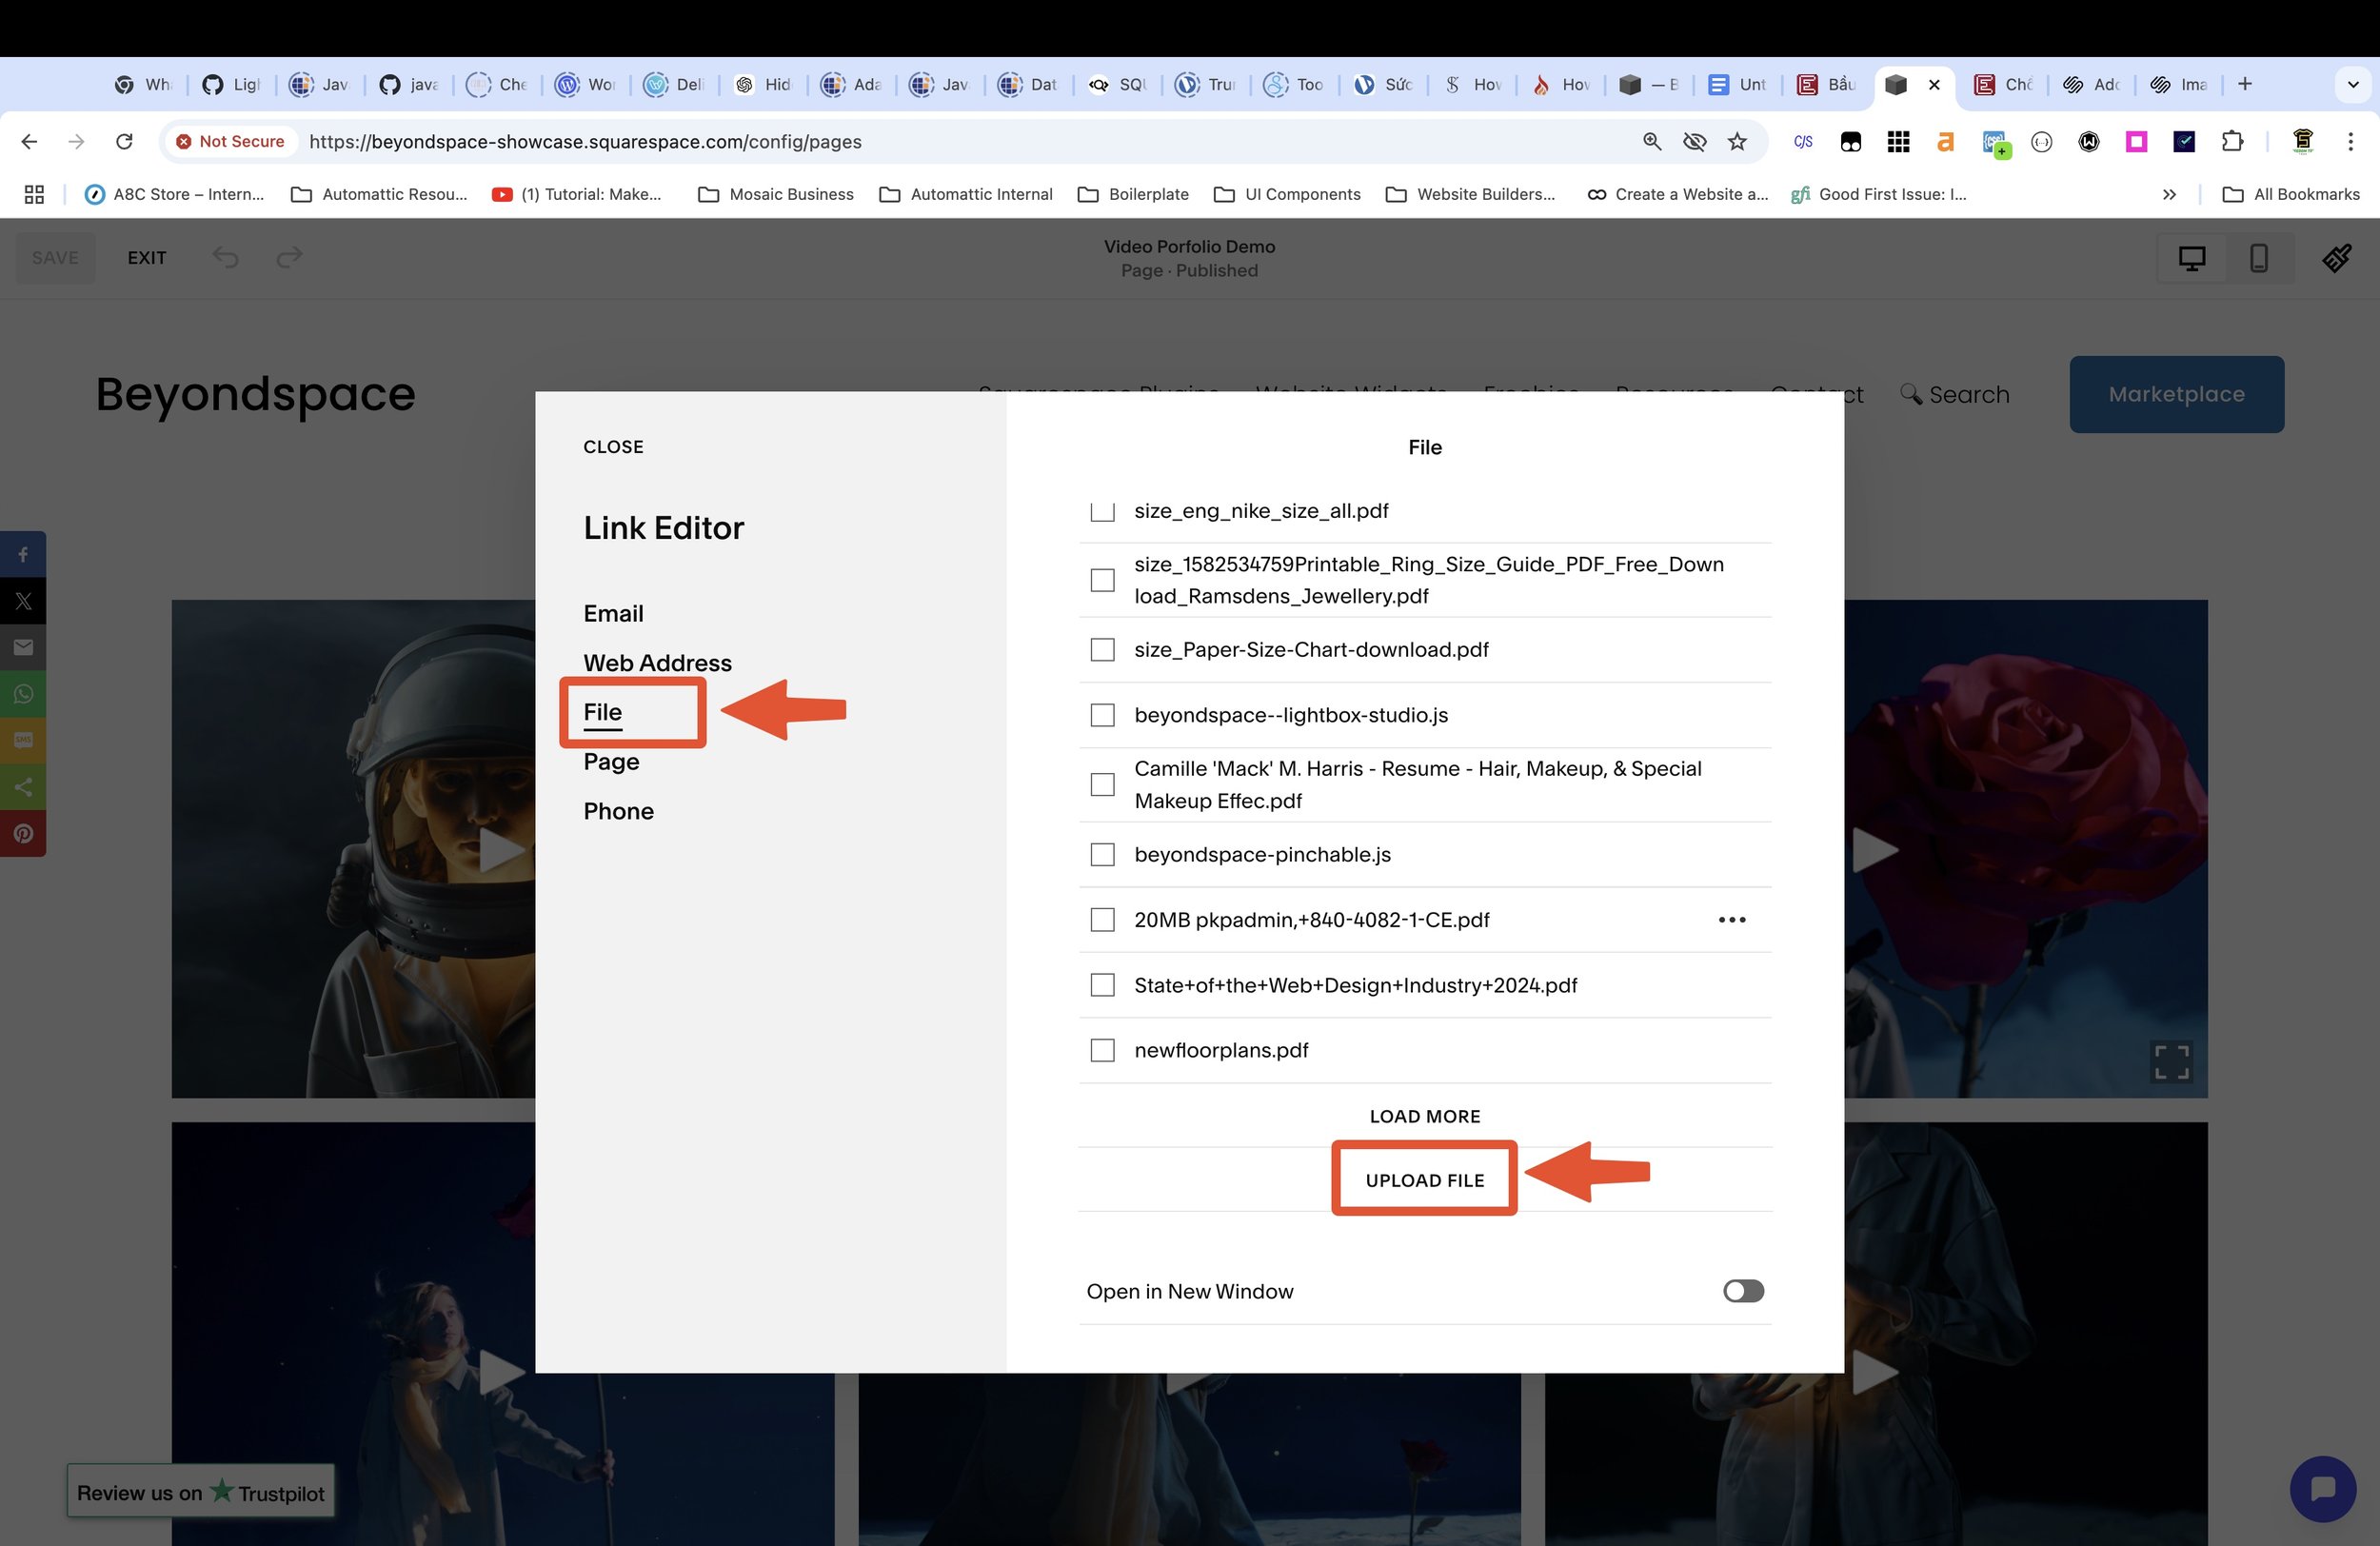
2. In the Link Editor opened, switch to File option
Upload file to Squarespace
3. From there you can upload the file from your device, remove the current one or reuse the existing files
Click the upload icon to upload new files
Hover on the UPLOADED FILES list item to Rename or Remove the file
Click on the checkbox on the left to select the file
Edit uploaded files
After upload the file, you may want to remove the link on the navigation, because adding link is just a getway to access the Link Editor and manage uploaded files.
The methods below will introduce different entry points to the file manager in various places, you can follow step 2 - 3 to manage files
Adding a File via Text content
1. In any Text Block, Product Description, or Blog Post, highlight the text you want to link to the file.
2. Click the link icon in the text toolbar, then click the gear icon to access the Link Editor.
Select text block
3. Select File in Link Editor and upload a new file or choose from existing files.
Adding a File via Image Block:
1. Insert an Image Block to your page
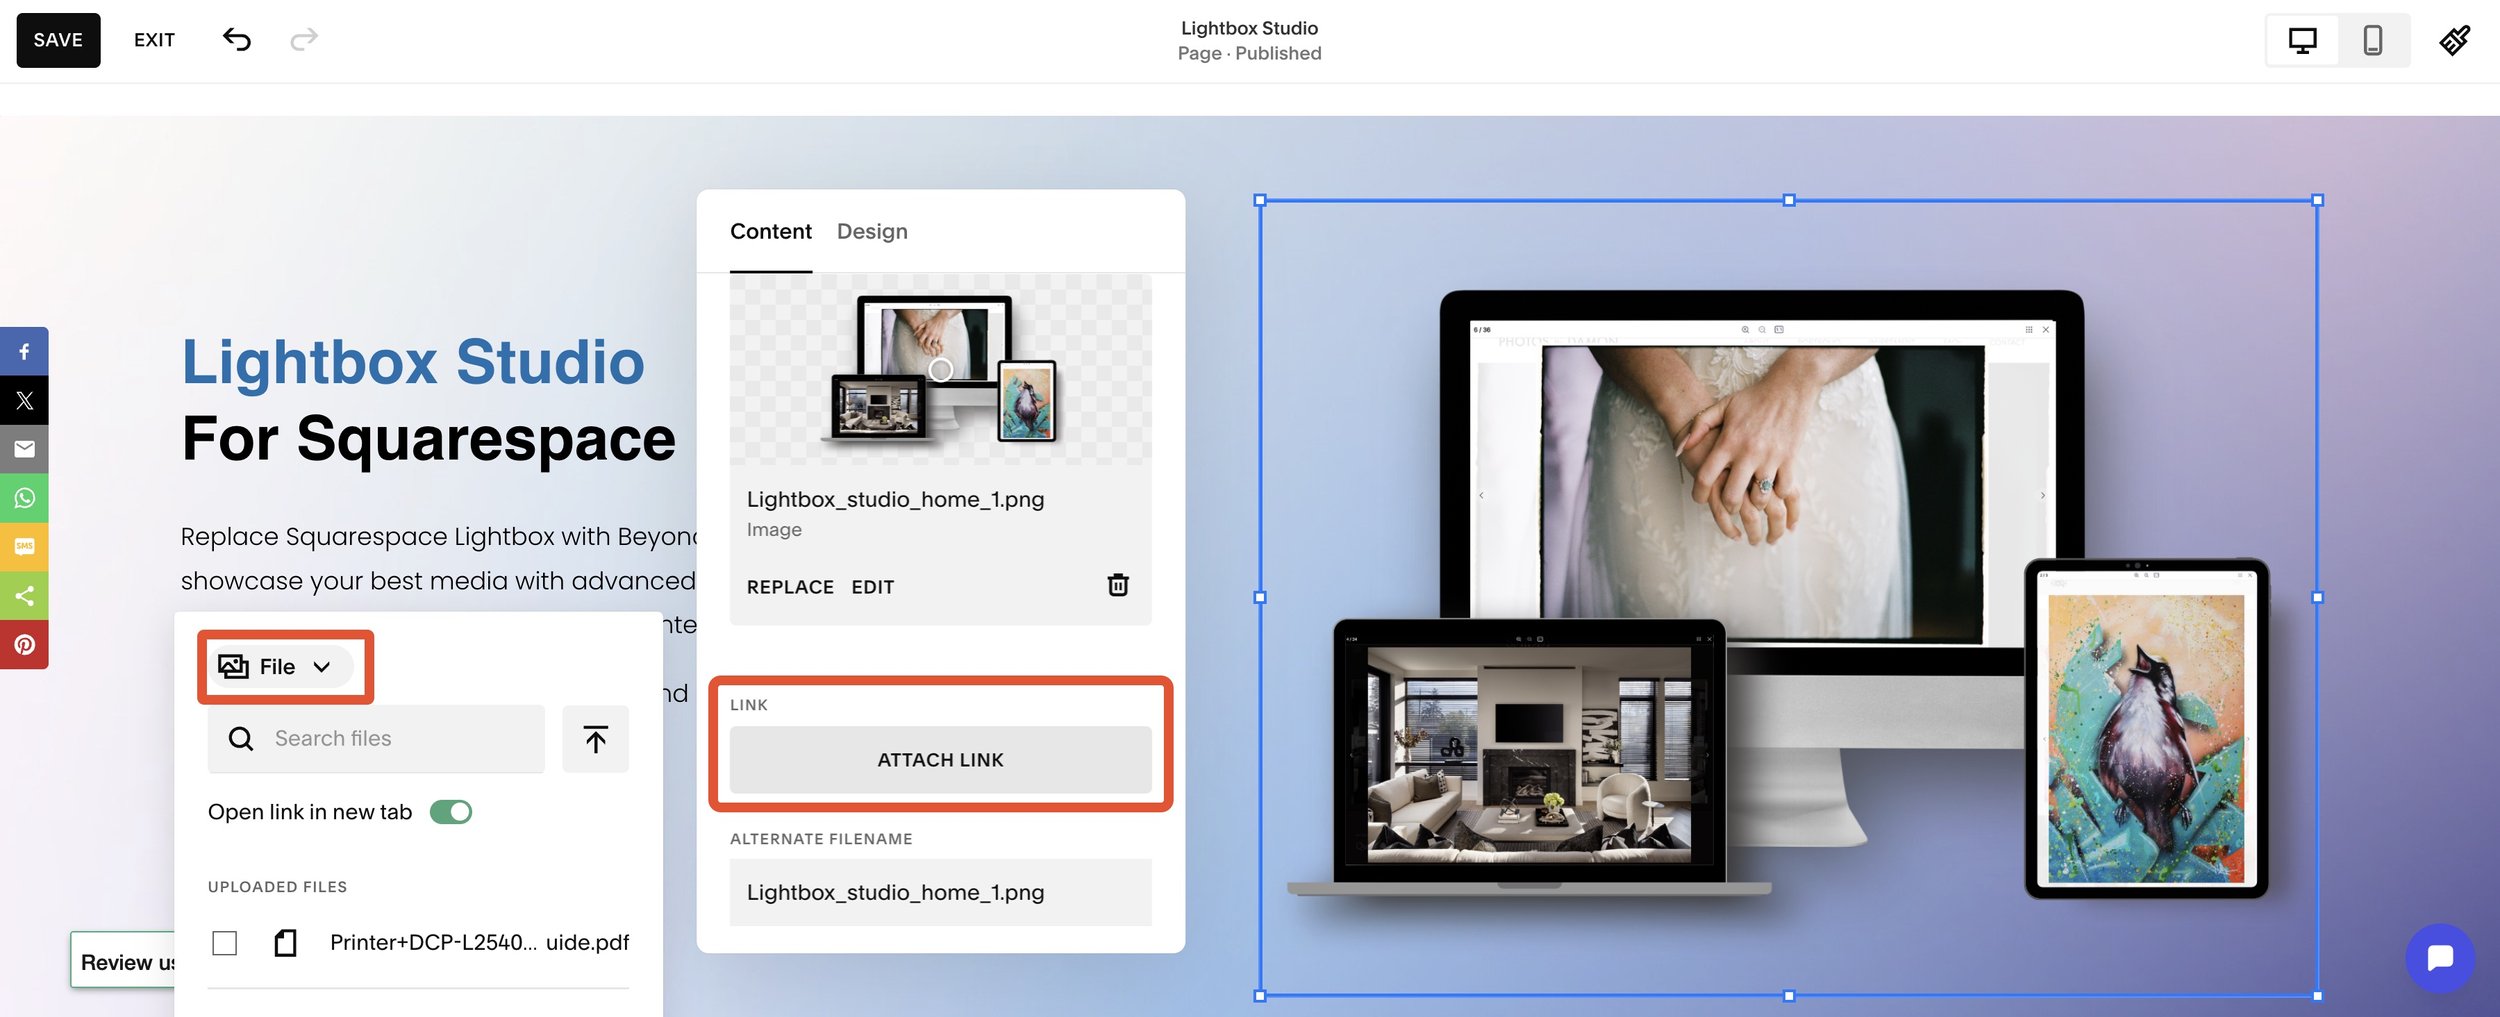
2. Select the image, then click the Pencel icon in the block and click Attach Link
Attach Link in Image block
3. Select File in Link Editor and upload a new file or choose from existing files.
Adding a File via Button Block:
1. Insert an Button Block to your page
2. Select the image, then click the Pencel icon in the block and click Attach Link
Attach Link in Button block
3. Select File in Link Editor and upload a new file or choose from existing files.
Note to readers: Check this official document from Squarespace to check different ways to add buttons to your site.
“Classic” Link Editor
For those familiar with Squarespace’s older layouts, the “Classic” Link Editor is a familiar option. This editor categorizes links into Links, Emails, or Files, and it’s available when adding clickthrough links on Gallery sections or Markdown blocks.
Here’s the tutorial to upload files to Squarespace, it used the Gallery section’s Classic Link Editor as gateway to the File manager
Here's an interactive tutorial
** Best experienced in Full Screen (click the icon in the top right corner before you begin) **Adding a File via Gallery section:
Edit a page with Gallery section from your Pages panel.
1. Hover over the gallery section and click Edit gallery.
2. Click the image where you want to add the clickthrough URL.
Edit gallery section
3. In the Link field click the Gear icon to access the “Classic” Link Editor
Add file to Gallery section
4. Once the upload is finished you’ll see the file name display in the list, it means the file has been uploaded to the Squarespace backend.
If you want to select the file, select the checkbox next to the file item. Click Save.
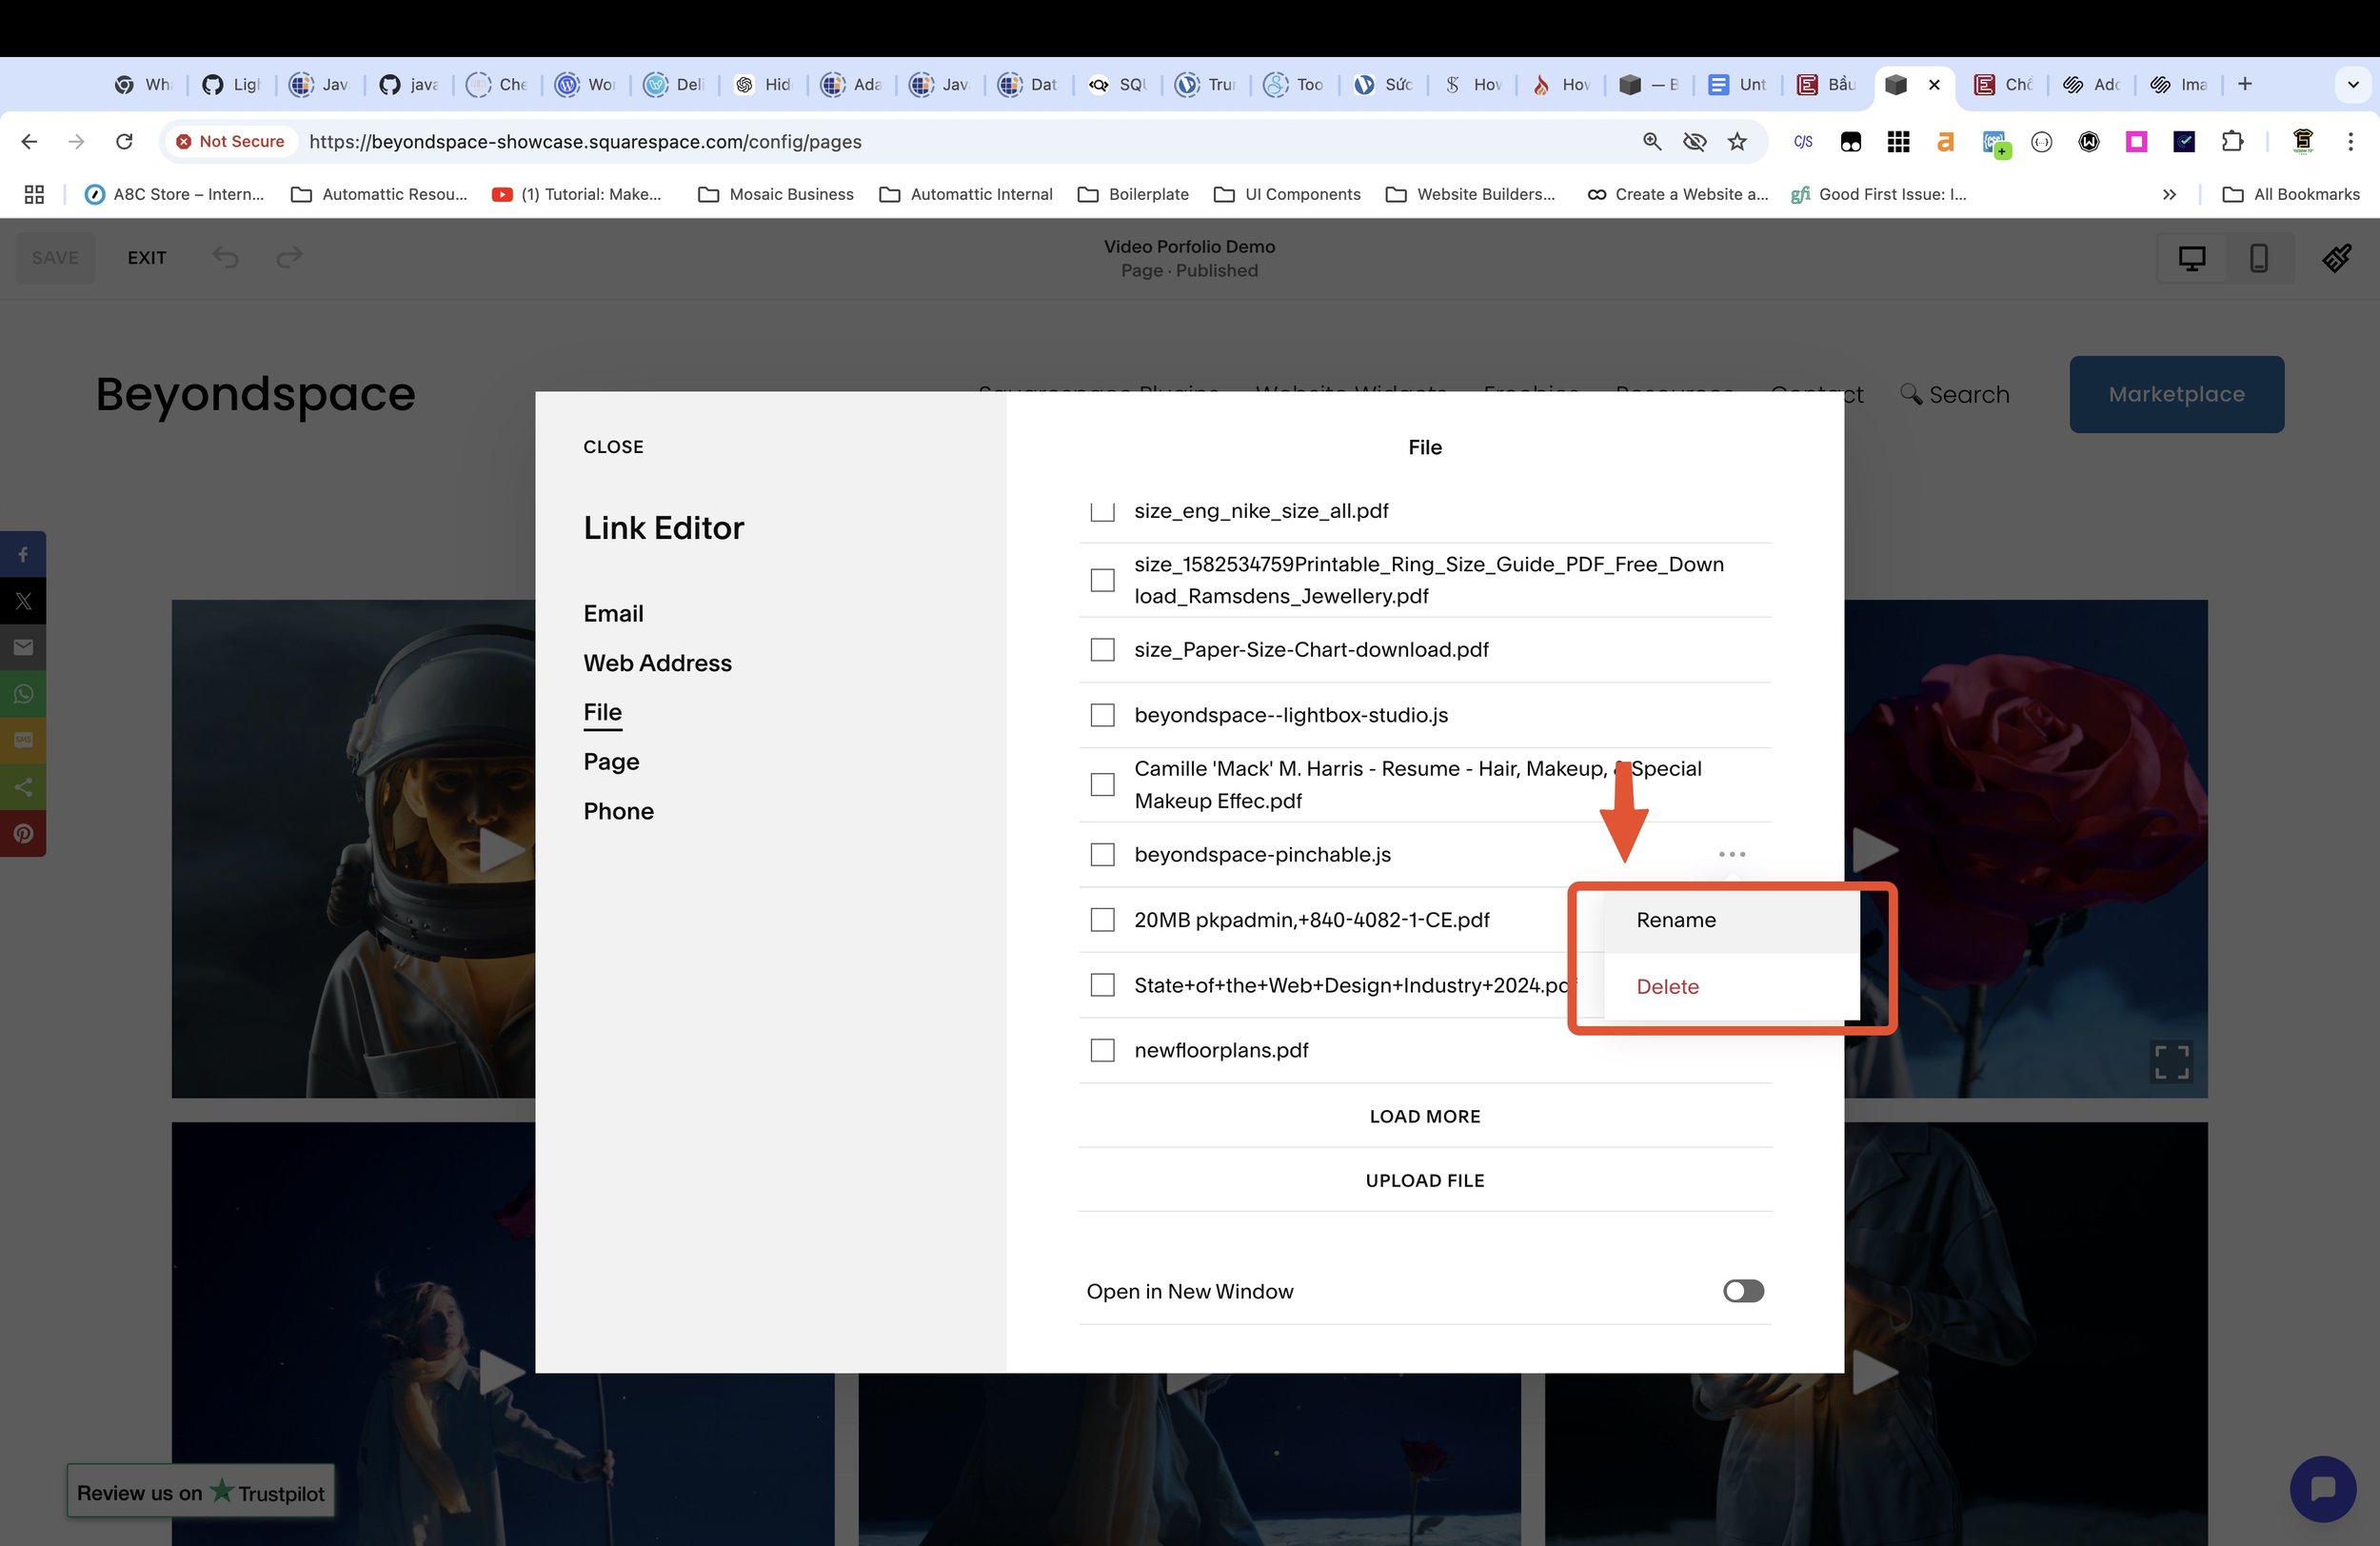
5. To edit a file, hover the file item and click the three dots icon
Rename to change the file name
Detete to remove the file
Edit file in Link Editor
Adding a File via Markdown block:
Edit a page or post, click Add Block or an insert point, and select Markdown from the menu
1. Open the block editor by clicking the pencil icon on the block.
2. Select a text, then click Link icon
Markdown block insert link
3. Click the gear icon on the tooltip to open the Link Editor
4. Switch to File tab in the Link Editor to manage files
Link Editor in markdown
“Legacy” Link Editor
Squarespace users prior to version 7.1 may recognize the Legacy Link Editor. While it is mostly deprecated, this editor can still be accessed when editing clickthrough links in gallery blocks.
Here’s the tutorial to upload files to Squarespace, it used the Gallery block Legacy Link Editor as gateway to the File manager
Here's an interactive tutorial
** Best experienced in Full Screen (click the icon in the top right corner before you begin) **Adding a File via Gallery block:
Add a gallery block to your site and upload your images, or edit an existing gallery block.
1. Double click to the image you want to access clickthrough URL
Open image editor
2. In the Image editor, Click Click to add URL... to open the “Legacy” Link Editor.
3. Switch to File tab in order to access the file manager
Add file in Gallery block
4. Click Add a file to upload new file
CSS Custom files manager
The CSS Assets File Manager is a specialized area within the Custom CSS settings for adding files like fonts, images, or videos that relate directly to your website’s styling.
Uploading Files to CSS Assets
To add CSS asset files:
1. Navigate to Wesbite > Pages and scroll down to the bottom of the panel, Website Tools
2. Open the Custom CSS panel
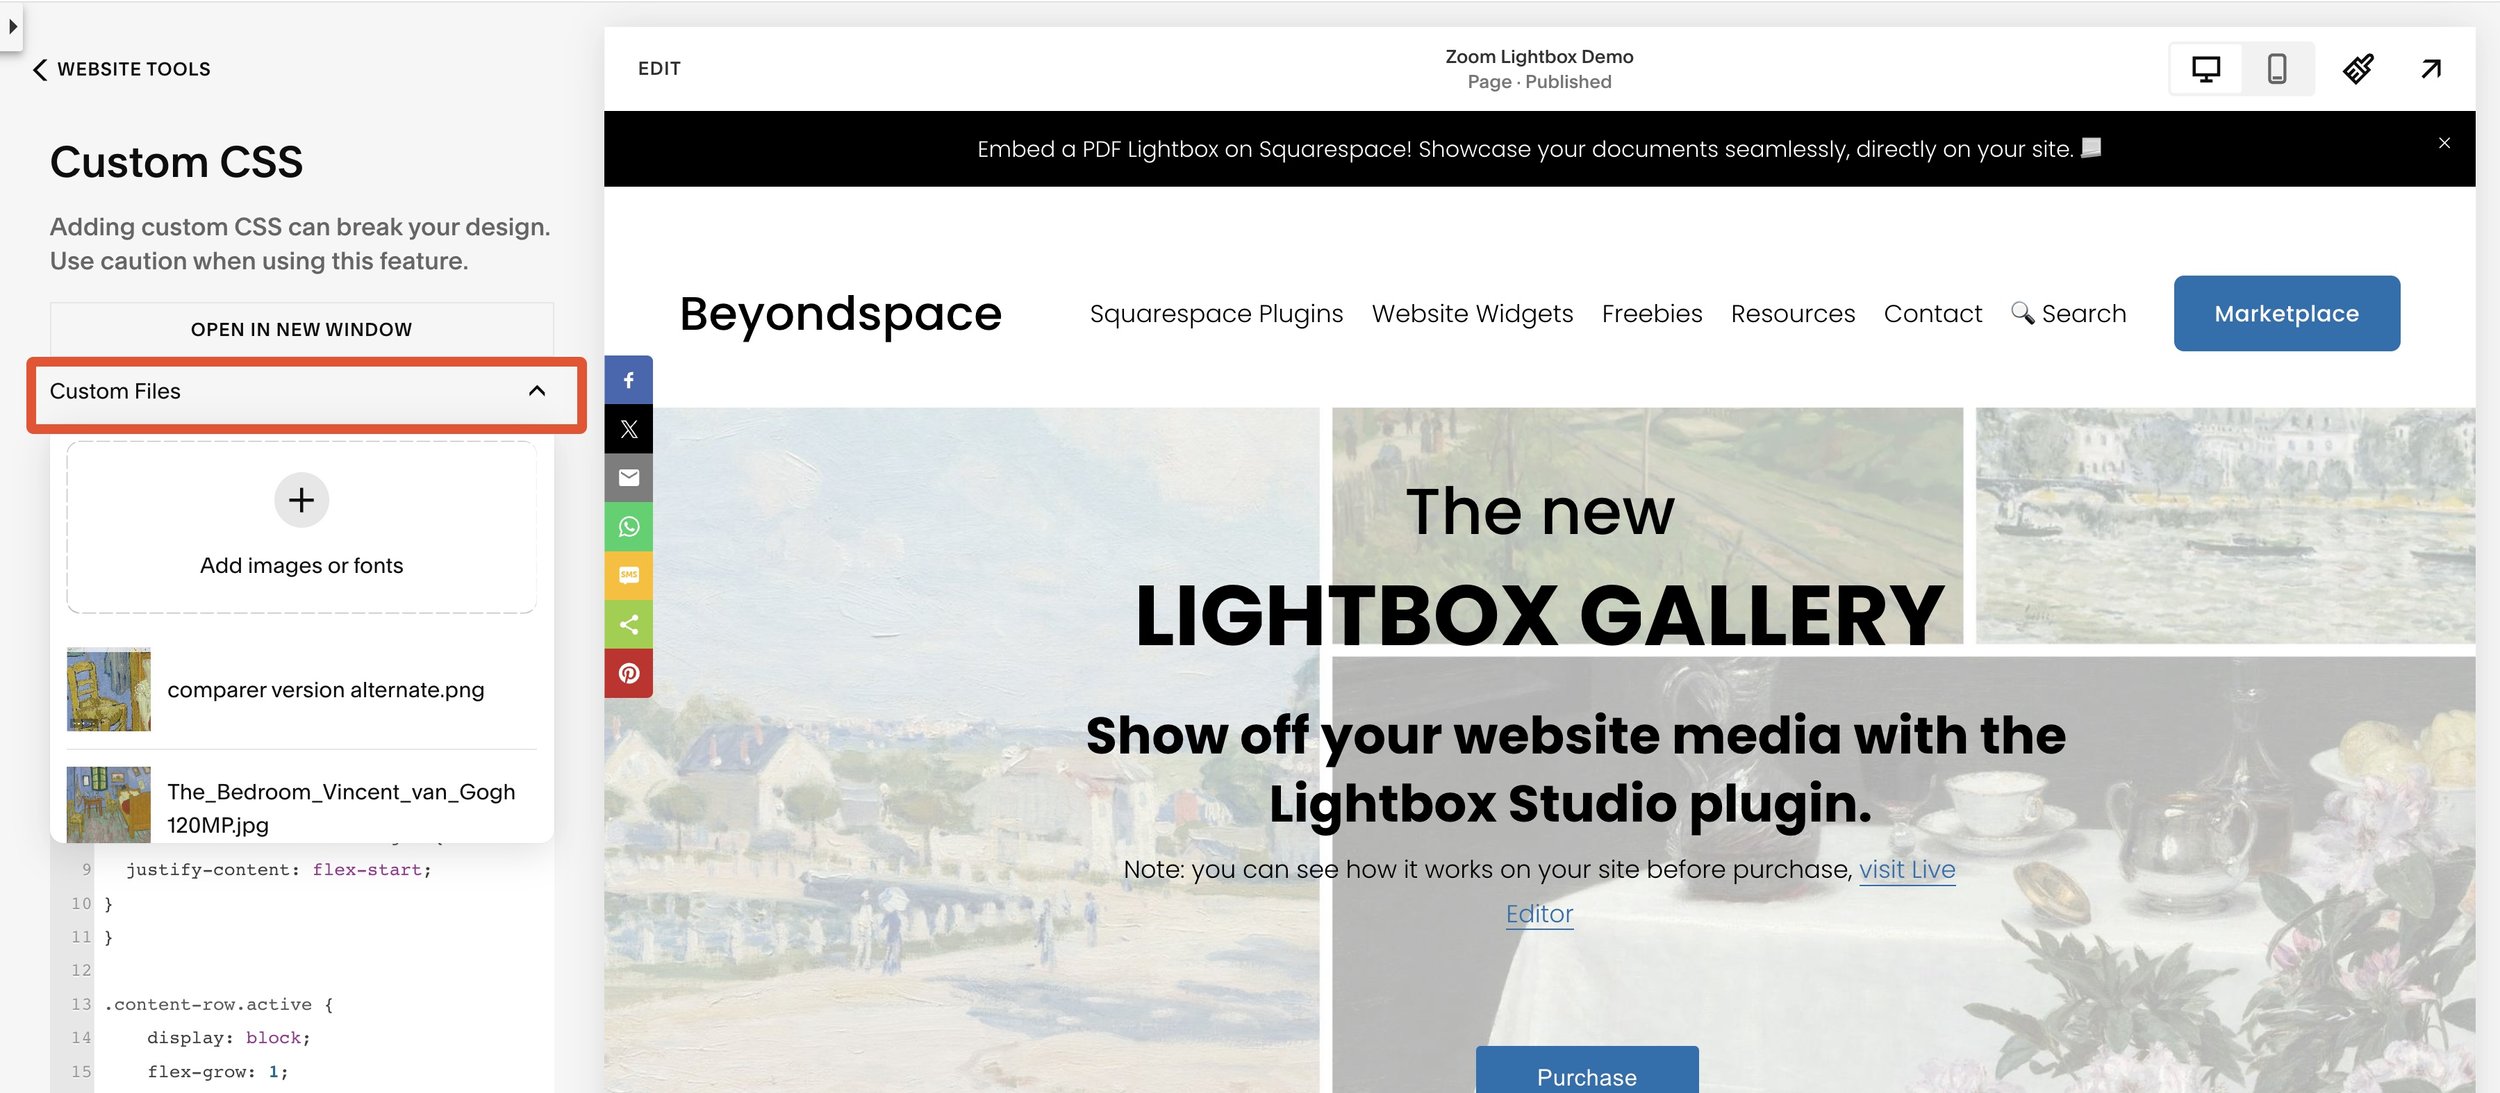
3. Click Custom Files and choose a file from your hard drive or drag.
Custom css Custom files
Once uploaded, you can insert the file’s URL directly into your CSS by clicking on it, allowing easy styling with custom images, fonts, or videos.
To remove the file, hover the file item and click the X icon
Assets Library
The Assets Library manages all images and videos used in Squarespace for image blocks, galleries, section backgrounds, and more. This centralized library is ideal for managing media files across your site, allowing easy organization and removal.
To open the Assets Library:
1. Go to admin dashboard, then choose Website > Assets Library.
2. Click UPLOAD to add new file
Squarespace Assets Library
3. In Assets Library you can add file into seperate folders, making it easier to manage similar files
The Assets Library allows management of JPEG, JPG, PNG, GIF images (up to 20MB) and videos, with a maximum resolution of 120MP for images.
Uploaded videos are limited to 30 minutes of storage (plan-dependent) and are automatically resized by Squarespace to two variants: 360p and 1080p, delivered in HLS format for optimal viewing.
Additional insights
You can review all the differences between the file manager above in the following table
| Feature / Method | Link Editor | Custom CSS File | Assets Library |
|---|---|---|---|
| Supported File Types | Any file type | Images, videos, fonts | Images, videos |
| File Size Limit | 20MB | 20MB | 20MB for images, with 120MP resolution cap |
| Primary Use Case | Access files in links throughout site | Attach custom files for CSS customization | Manage images and videos for site content |
| Storage Location | Squarespace Static CDN | Squarespace Static CDN | Squarespace Image & Video CDN |
| File URL Structure | /s/ redirection path | Plain URL | Image & video URLs in standard Squarespace CDN format |
While files uploaded through the Link Editor use a
/s/pathname, they are stored on the Squarespace static CDN (static1.squarespace.com). The/s/path acts as a 301 redirect to the file's real URL on the CDNIf a file uploaded to your Squarespace site was indexed by Google and remains showing up on search results, you can email [email protected] to request permanent removal from their server. They respond quickly, and once removed, Google will update search listings within a few days, clearing the PDF’s content from search results.
For more details, visit Squarespace's support page on file removal.
Noteable use cases
PDFs in lightboxes: Upload PDFs to Squarespace and link them in lightboxes for easy viewing, ideal for documents like resumes or product guides.
Video Lightbox gallery: Display videos in a custom gallery by linking them in a lightbox.
Hi-res zoom Images: Use high-resolution images uploaded to Link Editor or CSS files to enable zoom functions for an enhanced user experience.
Mimic Root directory upload: By tracing to the source of files in the Link Editor, you can simulate uploading files directly to the root directory. This can be helpful for verification files, downloadable assets, or other documents that typically require root directory access.
Conclusion
Each Squarespace file storage method serves distinct needs, allowing you to link, display, and style content effectively. By choosing the appropriate file method, you can optimize content accessibility and maintain control over how files are accessed and displayed.


