How to index Squarespace website with Search engines in 2025
Imagine putting a lot of effort into publishing quality content, only to find that it doesn't show up in any search engine results. This is exactly the situation I faced. In this post, we will discuss how to get your Squarespace website indexed so you can benefit from organic traffic.
Why You Need Site Indexing
By allowing search engine bots to crawl your website, you enable them to extract information from your site and present your content when users search for relevant keywords. For example, if you type "CMS builder" into Google, it will show a list of relevant results.
If your site is not properly set up for indexing, no matter how hard you work to polish your content, Google and other search engines won't know that your site is creating, updating, or deleting content over time. This can harm your online presence.
Setting Up Squarespace for Indexing
Now that you understand the importance of indexing, let's go through the steps required to get your site indexed.
1. Find Your Squarespace Sitemap
A sitemap on Squarespace is a collection of URLs that lets search engines know about your site's content and structure. Squarespace generates a sitemap when you create your site, and it updates automatically as you update your site's content. To preview your sitemap, access it from your domain:
yoursite.com/sitemap.xmlyoursite.squarespace.com/sitemap.xml

Update Squarespace Sitemap
The creation and update of your sitemap are automatic, so you cannot edit the Squarespace sitemap directly. Changes you make to your Squarespace site will be reflected in sitemap.xml after a certain period, ranging from hours to days.
Although you cannot edit the sitemap directly, you have several ways to control which pages are included. The sitemap.xml will exclude the following types of pages:
Disabled pages and password-protected pages
Pages and collections set to "Hide from search results". For certain collections (like blog), you can also exclude categories and tags from Search results
Old URLs in redirects
Not Linked pages are still added to the sitemap.xml, so make sure you properly exclude them by disabling them or setting them to "Hide from search results." Setting up page visibility will take time to take effect in your sitemap.xml, similar to content changes.
2. Submit Sitemap to Search Engines
Now that you have located your sitemap, you need to let search engines know about it too. The process for sitemap submission is different for each search engine.
Google Search Console
Google Search Console is where you manage search analytics from Google. First, you need to verify your website using the built-in Google Search Keywords tool in Squarespace.
Head to your Squarespace dashboard.
Go to Analytics > Traffic > Search Keywords.
Click "Connect" to start verifying your site with Google Search Console.
Here's an interactive tutorial
** Best experienced in Full Screen (click the icon in the top right corner before you begin) **

Submit your sitemap to Google Search Console:
Open Google Search Console.
Navigate to Sitemaps and click "Add a new sitemap."
Enter
sitemap.xmlatyoursite.com/sitemap.xml.Click "Submit."

Submit sitemap google search console
Bing Webmaster Tools
Check this article on how to verify your site with Bing Webmaster Tools.
Once your Squarespace site is verified, submit your sitemap:
Open Bing Webmaster Tools.
Navigate to Sitemaps and click "Submit sitemap."
Enter
sitemap.xmlatyoursite.com/sitemap.xml.Click "Submit."

Submit sitemap bing search console
After submitting your sitemap, you will have to patiently wait for the search engines to index your site, which could take days to weeks.
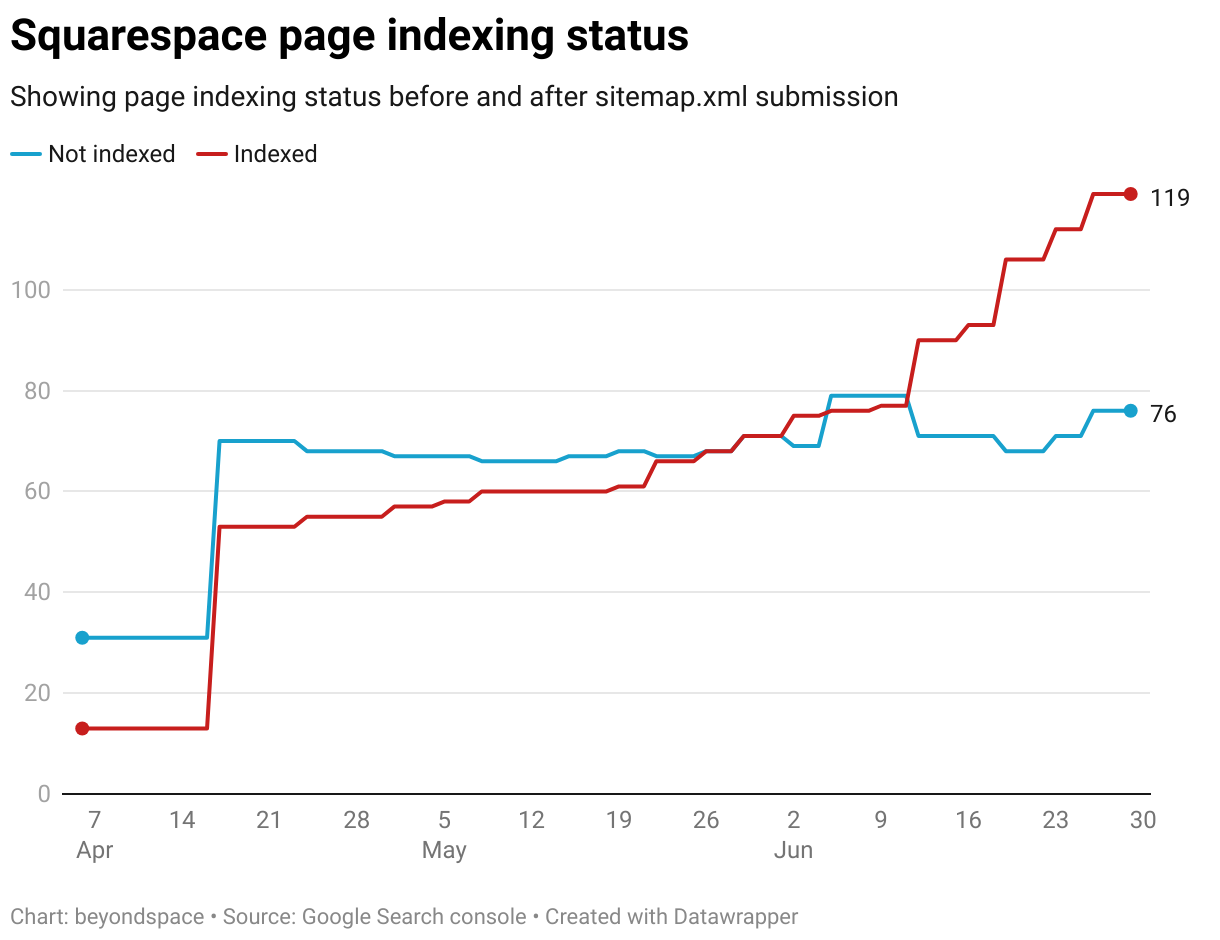
Let's take a look at how sitemap submission affected my Squarespace website's index status: after submitting the sitemap on April 18, 2024, the indexed pages number increased almost instantly!
3. Maintain updates on search engines
There is always a delay between editing content and when the content is indexed by Google since Google periodically checks for changes to your sitemap before putting the updated content into the queue. You can speed up this process by submitting individual URLs to Google Search Console, which will give your URL crawling priority.
Submit URL to Google
Use the URL Inspection tool in Google Search Console:
Click on the URL inspection button in Google Search Console.
Enter your URL into the inspection bar and press "Enter" or click "Search."
If the status of the URL is "URL is not on Google," click "REQUEST INDEXING" and wait for the process to complete.

Request indexing for individual page on GSC
Submit URL to Bing
On Bing Webmaster Tools:
Open URL Inspection.
Enter your URL and click "Inspect."
If the status of the URL is "Not discovered," click the "Request indexing" button.

Bing webmaster URL Inspection
Note that URL submission only gives your URL crawling priority. There is no guarantee that it will be indexed quickly, so you might find yourself repeatedly using the URL inspection tool and pressing the "Request indexing" button. This can be fine if you have few pages on your site, but if you regularly publish multiple pages, this process can be tedious.
How to automatically index Squarespace site content
With billions of webpages and more being published every day, it is crucial to get your new pages indexed as fast as possible, not only by Google but also by other search engines like Bing, Naver, Seznam.cz, Yandex, and Yep.
The tool I use is pageindexer.io, which automatically submits your new content to search engines, keeping it indexed as quickly as possible within 24-48 hours. However, there are other apps that can do the job. My preference is for a tool that is simple to use and supports batch submission to Google as well as supports IndexNow—a new search initiative from Microsoft that supports Bing, Yandex, and other search engines.
Here is a comparison table between some of the auto indexing tools: PageIndexer, Tagparrot and UrlMonitor
| Feature | Tagparrot | Pageindexer | UrlMonitor |
|---|---|---|---|
| Minimum Price | $11/month (Small) | $7/month (Small) | $15/month (Starter) |
| One-time Payment Plan | - | - | $59 via AppSumo 🔗 |
| Pages Indexed per Day | 200 | 200 | 400 |
| Google Accounts Linked | 2 | Unlimited | 1 |
| Index Status Timeline | No | Yes | No |
| Bulk Indexing | Yes | Yes | Yes |
| Auto Indexing | Yes | Yes | Yes |
| Email Notification | Yes | No | Yes |
| IndexNow Support | No | Yes | No |
Conclusion
Ensuring your Squarespace site is indexed by search engines is crucial for increasing your site's visibility and attracting organic traffic. Proper indexing allows search engines to crawl and understand your content, presenting it to users who search for relevant keywords. Without proper indexing, search engines cannot discover and rank your content, no matter how high-quality it is. Indexing helps your site appear in search results, increasing its online presence and potential traffic.
Additionally, choosing an auto indexing tool can help your content get indexed as fast as possible, allowing you to focus on producing quality content and optimizing on-page and off-page SEO. These tools automate the submission process and ensure your new pages are quickly recognized by search engines, maintaining your site's competitive edge in search results.